My BFF - The Bling Queen!

Pink Stamper

Support Team Monique!

Oh My Crafts

Stamps Alive

Hallmark Scrapbook

Everyday Cricut
Obsessed with Scrapbooking

Expressions Vinyl

Lezlye's Ink & Paper

Official Cricut Blog

Tuesday, August 23, 2011

Guess what! We have TWO new layouts to share with you today, and they're both kits. Either of these new kits can be ordered from our Cricut Kits page, which can accept PayPal or Google checkout. There's also the option to order just the directions, and then you can automatically download them. If you'd rather pay by check, just email me your order at moniquegriffith@yahoo.com and let me know your state or zip code.
The first kit, "Go Wild" is by Becca Rees and uses the super fabulous Create-a-Critter cartridge. Isn't this just the cutest layout? It would be perfect for pics of a zoo day, or the kiddos monkeying around at the park - or even for a day at Disney's Animal Kingdom. (Oh, and don't forget to see below for the winner of last week's blog candy!)

Included with this kit will be all of the patterned papers, cardstock and ribbon needed to complete the layout. You'll also get our detailed directions with Cricut Cut Chart that shows you line by line exactly what to cut on your machine, with all of the settings. The directions also include well-organized written instructions and several color photographs.

To complete this project as shown, you'll need a Cricut Expression and mat, Create-a-Critter cartridge, chalk inks in the following colors: dark brown, blue, orange and purple, 3D pop dots, white gel pen, black pen, Diamond Stickles, plus basic tools and adhesive. Cuttlebug and Divine Swirls embossing folder are optional.

Next up is "The Simple Life" layout, designed by me (Monique). Wouldn't you love to just jump into this layout and live there for a week without a care in the world? Ok, unless that means getting up at 4:00am to milk the cows.

As with our other kits, this one will include all of the papers, cardstock, and ribbon needed to complete the layout. And by the way, we also pre-cut some of the background strips and the photo mats for you. Of course, you'll also get full directions with cut chart and lots of color photographs.

To complete this project as shown, you'll need the following: Cricut Expression and mat, Country Life cartridge, dark brown chalk ink, 3D pop dots, white gel pen, black pen, stapler, plus basic tools and adhesive. Cuttlebug and embossing folders (Divine Swirls and Tiny Mosaic) are optional but helpful.

Either of these new kits can be ordered from our Cricut Kits page. The complete kits are each $25, which includes full directions. Or you can order just the directions for $10 and then download them automatically. Both kits are ready for shipping NOW. If you have any questions, just email me at moniquegriffith@yahoo.com.
And finally, we have a winner for last week's blog candy! Please email me at moniquegriffith@yahoo.com with your shipping address, and I will send you the brand new "The Simple Life" kit (shown above). Congrats!
Shelley said...
Glad to see you guys posting again! :) Love the new layout! You are both so talented! Like mother, like daughter! :) Thanks for the chance to win as well. Take care!
Shelley
http://carleys-closet.blogspot.com
shelleymace21@gmail.com

Thursday, August 11, 2011
As promised, here is the nifty new layout by Nana Susan. She has been busy creating this summer! This layout IS a kit, and is available for shipping now! To order, just go to our Cricut Kits page to use our shopping cart. Or you can just purchase the directions and download them automatically.

This rockin' retro layout would be perfect for older pics from the 50's, or even pics from a modern sock hop or just a night out getting milkshakes at your favorite diner. The kit will include all of the patterned papers, cardstock, and ribbon that you'll need to complete the layout. Plus you'll get our detailed directions with Cricut Cut Chart that shows you line by line exactly what you need to cut on your Cricut with all of the settings for each cut - and plenty of color photos to help you out.

To complete this project as shown, you will need the following supplies: Cricut Expression and mat, Nifty Fifties cartridge, charcoal or black chalk ink, 3D pop dots, white gel pen, Diamond Stickles, Gold Stickles, plus basic tools and adhesive. Cuttlebug and embossing folders are optional.

The complete kit with full directions is $25, and can be ordered from our Cricut Kits page. Or you can purchase just the directions for $10, and then download them automatically in pdf format.

And by the way, we have now added some of the other newer directions sets to our shopping cart, so be sure to check it out. If you have any questions at all, you can email me at moniquegriffith@yahoo.com.

Be sure to leave a comment for a chance at some fabulous blog candy. You could win my new kit, "The Simple Life", which is coming out very soon and uses the Country Life cartridge. And keep an eye on the blog for more on the way!

Be sure to leave a comment for a chance at some fabulous blog candy. You could win my new kit, "The Simple Life", which is coming out very soon and uses the Country Life cartridge. And keep an eye on the blog for more on the way!
Saturday, July 30, 2011
Hello, crafty friends! Monique here. Sorry it’s been so long since we’ve posted on the blog. The summer started off with a bit of a health scare for me, which thankfully turned out to be fine. But I also figured out that it was imperative for me to take some time off immediately for my mental and physical well-being, and work on finding a healthier balance in my life. So I have been spending lots of time with my little girl, hubby, and the rest of my family and friends, relaxing and traveling, and exercising a lot. (I’m even training to do a triathlon in October. Crazy, but fun!) It’s been a really incredible summer, and it took that little health scare to shake me up and realize that I need to be spending the bulk of my time a bit differently.
Now what? Well, now that you know I haven’t actually fallen off the face of the planet, I think you also may be pleased to know that the design team and I have been busy the past month. We each have a layout kit to release very, very soon. We’ll start it off in the next few days with Susan’s “Cruisin” layout, which uses the Nifty Fifties cart. Then Becca will introduce her adorable “Go Wild” layout, using the Create-a-Critter cart. Next up will be my new farm-themed layout “The Simple Life”, which uses the Country Life cart. And finally, Wendy will make a splash with her “Pack Your Bags” layout, using the Pack Your Bags cart, of course!
We won’t be posting daily as we were previously doing, but we’ll at least try to post a couple of fun things each week, and a giveaway now and then too. Whatever we can do while still maintaining some healthy life balance!
Thank you so much for all of your patience and understanding, and to those of you who dropped me an email to check on me. Things are going much better now!! I’d love to hear from you all. Leave me a comment and let me know what you’ve been up to this summer – or if you still have some exciting plans before school starts up again.
 |
| Jared, Emily and me with Goofy at Disneyland in June. What a great family trip this was with the 3 of us, and now I can't wait to go again! It was so much fun to feel like a little kid. |
Now what? Well, now that you know I haven’t actually fallen off the face of the planet, I think you also may be pleased to know that the design team and I have been busy the past month. We each have a layout kit to release very, very soon. We’ll start it off in the next few days with Susan’s “Cruisin” layout, which uses the Nifty Fifties cart. Then Becca will introduce her adorable “Go Wild” layout, using the Create-a-Critter cart. Next up will be my new farm-themed layout “The Simple Life”, which uses the Country Life cart. And finally, Wendy will make a splash with her “Pack Your Bags” layout, using the Pack Your Bags cart, of course!
We won’t be posting daily as we were previously doing, but we’ll at least try to post a couple of fun things each week, and a giveaway now and then too. Whatever we can do while still maintaining some healthy life balance!
Thank you so much for all of your patience and understanding, and to those of you who dropped me an email to check on me. Things are going much better now!! I’d love to hear from you all. Leave me a comment and let me know what you’ve been up to this summer – or if you still have some exciting plans before school starts up again.
Friday, June 17, 2011
Happy Friday! shelly here today . WOW i was so honored when wendy approached me about being guest designer for this month. i havent had the pleasure of meeting her or monique who i hear are just the sweetest but we live about 2 hours away so a visit is in the future.
thank you so much monique and wendy for thinking my crafty abilities are worthy.
for my project i made a card which is what i normally post on my blog. i do layouts too i just rarely share them.
i didnt make this card for any one specific person.. i made it for us all.. a reminder to NEVER lose yourself in someone or something so much that you lose yourself.
so now for the card..


for this i used walk in my garden (caterpillar) doodle charms (jar adding foam stickies behind for depth) and zoobaloo (branches and leaves. i bent one of the branches slightly and only adhered the top and bottom portions again for depth . pic 3 shows this)
wimg and d/charms were the first image carts i purchased, they are still my go to favorites.
i added stamped butterfly images, stickles, liquid pearls ,martha stewart border punch and colorbox fluid chalk.
thank you so much for your comments and thank you again monique and wendy for making me feel special :) have a great day and a fun weekend! happy crafting :) shelly
Friday, June 3, 2011

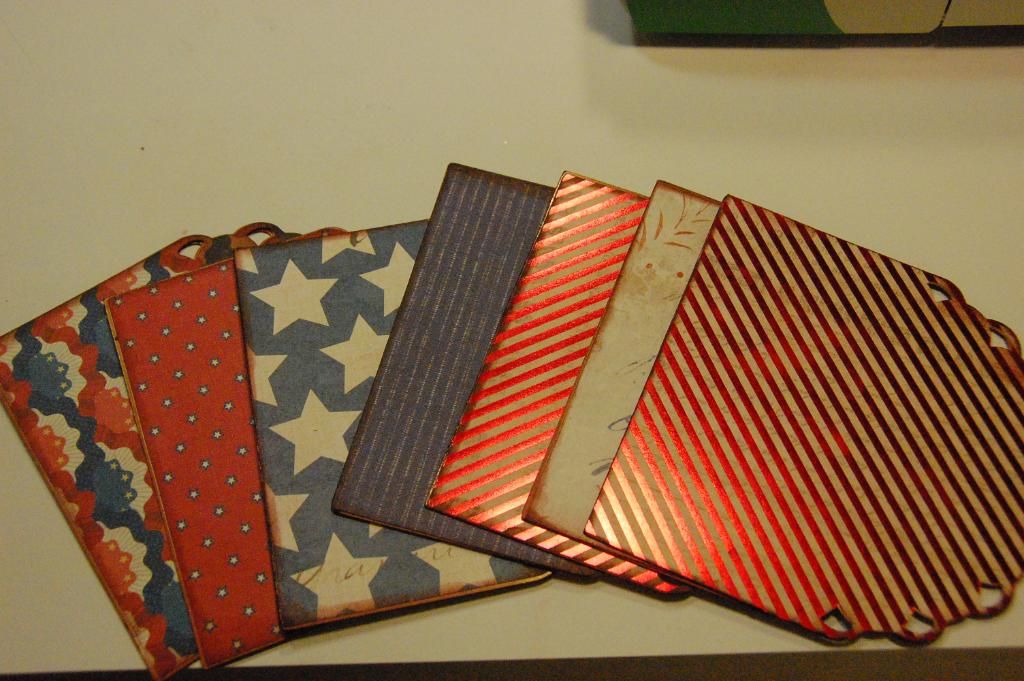
The base of the album is made using Elegant Edges. I cut the pages at 5.24 inches (Real Size Off). The paper is from K & Co Americana collection. This collection is awesome. I found it at Joann's. It is double sided and so full of yummy patterns! Once I attached all my papers to the album pages, I inked the edges with Chestnut Color Box ink. This particular shade of brown has a bit of a rust tone with really compliments the paper.

Next I bound the album with my Cinch.
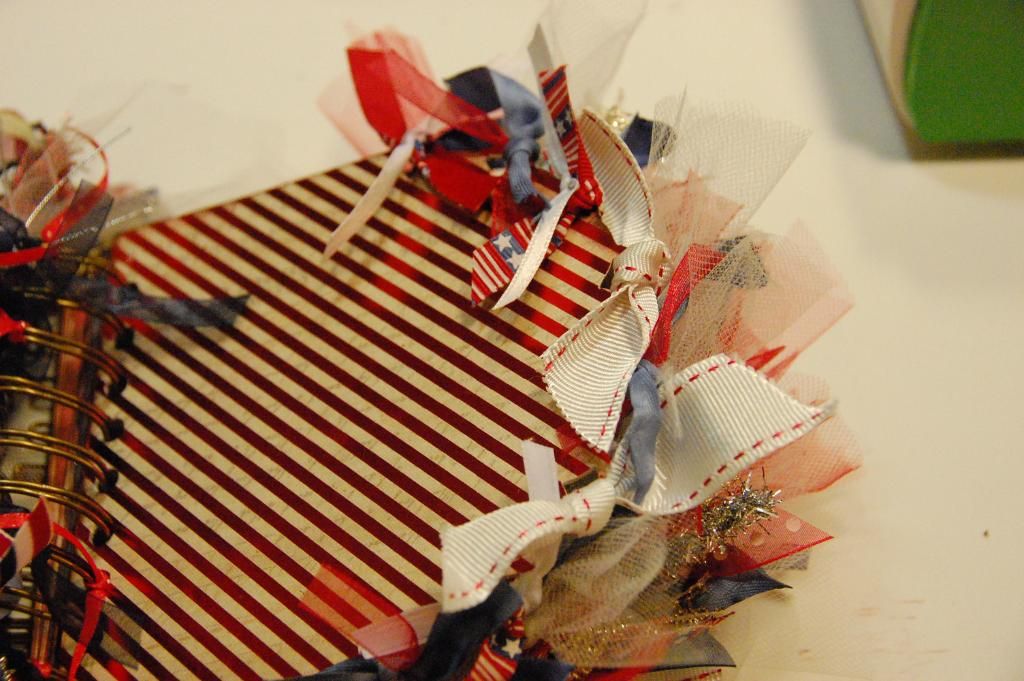
Then I began tying ribbons from my stash along the sides and the edges.

I kept tying until I felt like the album was full.

usually on my minis I like to have pockets and tags. But this one I did a bit different. I made a few of these straps out of thick ribbon to tuck pics and stuff into. I wrapped the ribbon tight and sealed to itself with ATG tape.

I then tied a flat bow and hid the seam. The ribbon is not attached to album. it is loose and can be lifted on both sides. I really love how this turned out!

Next I began cutting with nippers the back of these brads off. by cutting the back portion off, the brad will lay flat on my album. I used these on several pages and on the cover.

On the cover I used Pink By Design Stamps in Red, White and Blue to stamp the sentiments. I started with a red trimmed white grosgrain ribbon.

Using Archival Ink, I stamped the three sentiments to create a border. Stamping on fabric and ribbon is super easy and a great way to incorporate stamps into your project.

Since the ink dries pretty quick on fabric, I could add it to my cover using Terrifically Tacky Tape. Another feature on the cover I want to point out is the red metal spindle. I found this in a garage sale for a stamping store here in Kansas City. I always look for hardware items to add a bit of interest to my projects. To hide the hole in the spindle, I added a rhinestone. The font on the front is actually a phrase from Cricut Stand and Salute. The shadow layer and the sentiment are cut at 1.15 inches (Real Size Off). I also added some red white and blue pom poms. I found these at Joann's.
So do you want to see this inside pages?!?! I have both photos and video to share today.
I have a video of the this mini in action here:
If you are reading this on the blog, there is not need to click this link. It is for the readers who subscribe through Feedburner since Feedburner does not always add videos.

Here are the inside pages. I have made some notations about some pages and features. The bottecap on the left is from my stash.


The photo mats are all cut at 3.5 for base and 3.25 for top layer. On the right, I used some manila paper and stamped with Pink by Design Let's Write Backgrounder.


The stitching on these two mats are done with Paper Pizzaz Easy Stitcher. I used a White Signo Pen to the stitching. The Easy Stitcher is a a stencil that allows you to draw really straight stitching. I only wish I could draw that straight!

I love minis that become a part of my home decor. This one is no exception. It stand beautifully and can display all photos of my kiddos enjoying the holiday.

I want to thank you so much for looking through my album. This mini was so much fun to make. Now if you want the free Gypsy File, please visit my personal blog at 217 Creations.
I always appreciate the time it takes to leave a comment and to follow or subscribe both here at Monique Griffith Designs and on my blog 217 Creations. Have a great day!

Thursday, May 26, 2011
Happy Friday!! It's Sarah from Pink Cricut and I am SO excited to be guest designing for Monique and Wendy today!
I had the pleasure of meeting these super-sweet ladies at Winter CHA- and they are both so beautiful inside and out! :)


 Once you choose Hope anything is possible.
 I used kraft cardstock, papertrey ink cardstock and Spellbinders Lacey Squares.
I had the pleasure of meeting these super-sweet ladies at Winter CHA- and they are both so beautiful inside and out! :)
Here we are waiting to go into the Gala (Emma, Monique, Wendy, and me)
Okay-for today's project Monique and Wendy asked me to do a Breast Cancer awareness project- which was perfect timing- since my stamp company, Pink by Design is releasing 2 Breast Cancer Awareness stamp sets next week!
I did a 5x5 inch square card--using the DCWV Blossom Stack and the Forever Young Cricut Cartridge.

I embossed the dark pink layer with the Cuttlebug Swiss Dots folder, and the light pink layer with D'vine Swirls. (I think these are the 2 folders I use the most)
I layered it on top of a white doily I cut from a stock image on the E2.
I used a ton of pop-dots to really make the cricut cut stick out!

I then added some bling and bows - (what girl doesn't like bling and bows?) :)
Here is the inside of the card:
 Once you choose Hope anything is possible.
Since this card is going to someone I know- I also wanted to be able to give her something more.
So, I made her a little set of cards to go with her card!
 I used kraft cardstock, papertrey ink cardstock and Spellbinders Lacey Squares.
Each of these cards is stamped with the Pink by Design Save the Tatas stamp set, as well as the Breast Wishes stamp set that is coming out next Friday :)
The sentiments read:
Thanks for the Support
Breast of Friends
Hang in There
and Hope
I will tie these little cards with some pink twine and put them in a clear envelope to gift them in.
Thanks again to Wendy and Monique for having me on their blog! I hope you enjoyed my little projects- and feel free to come say hi to me anytime at Pink Cricut! :)
Have a great LONG weekend!
Friday, May 20, 2011

Happy Friday! It's Lauren here from Lauren's Creative! I am so thrilled that Monique and Wendy invited me to design a project for their blog today! They have both provided me with endless amounts of inspiration. I have only been scrapbooking for a little over a year and since finding Monique and Wendy's blogs - my scrapbook layouts have improved 110%. I could gush about them a little more, but I don't want to "fan-girl" them too much and freak them out. :)
For today's project they asked me to design a Breast Cancer Awareness themed project, and I immediately decided to come up with a layout with a "Race for the Cure" theme. I know many of you participate every year and I'm sure you have some beautiful pictures that you'd like to display in a special way!

If you prefer single page layouts, I think this page would make an adorable layout in and of itself. I would probably just add a journaling space in between the runners. I used the Pink Journey cartridge for the runners and the ribbon cuts, but even if you don't have that cartridge don't let that stop you from "scrap-lifting" this...there are similar runner silhouettes found on the Sports Mania cartridge. There are also similar ribbons on the Car Decals cartridge as well as Stand and Salute.
 I really wanted the runners to look like they were carrying the banner, so to achieve that look - I simply attached a glue dot to the top of a toothpick, so the baker's twine wouldn't come unraveled. I then wrapped the baker's twine around the toothpick a few more times and knotted it off. To create the streamers, I just tied another length of baker's twine around the end. I then secured them to the runners' hands by attaching another glue dot.

The second page is pretty simple - I really wanted the pictures to be the focus. It is a little hard to tell, but the middle picture is actually attached using pop dots to give a little more dimension to the page.

Thank you so much again to Monique and Wendy for having me!
I hope that if you like this project, some of you might come visit me on my blog - Lauren's Creative. If you have any questions about this layout - please don't hesitate to email me. (My contact information is on my site.)
- (2) 12 x 12 kraft cardstock (Recollections Brand - Michaels)
- (2) Scalloped Squares sized at 11.50" from Accent Essentials
- Photo Mats: Finished mats will fit - (1) 4 x 6 and (3) 4 x 4 photos
- 4 1/2 x 6 1/2 (white), 4 3/8 x 6 3/8 (brown) 4 1/4 x 6 1/4 (pink stripe)
- (3) 4 1/2 x 4 1/2 (white), 4 3/8" x 4 3/8" (brown) 4 1/4 x 4 1/4 (pink stripe)
- "Banner" sized at 3.02" (or 10.50" fit to length) from Twinkle Toes
- "Race for the Cure" sized at 1.5" using "Real Dial Size" from Cherry Limeade (shadows welded using my Gypsy)
- (2) "Runners" sized at 6.00" from Pink Journey
- (10)"Butterflies" sized at 1.50" using "blackout" feature from Pink Journey
- (5) "Butterflies" sized at 1.50" using "shadow" feature from Pink Journey
- "live," "love," and "fight" sized at 1.50" from Kate's ABCs (shadows welded using my Gypsy)
- "Pink Ribbon Flourish" sized at 2.65" from Pink Journey
- Journaling Space - "Scalloped Card" sized at 3.92" from Pink Journey, I added "Ribbon" sized at 1.07" and also used the "hide contour" feature to hide the score marks for the card.
- Tim Holtz Distress Ink - Walnut Stain
- Sakura Gelly Roll Pen - White
- Pink Gems - Michael's
- 3/8" Grosgrain Saddle Stitch Ribbon - Michael's
- Baker's Twine - Scrappy Moms Stamps
- (2) Toothpicks - you could also use lollipop sticks or wooden skewers
- Pop Dots
Subscribe to:
Posts (Atom)
About Me

- Monique Griffith
- Rocklin, CA, United States
- The Monique Griffith Design Team consists of 4 Cricut Designers: Monique, Wendy Lawrence, Susan Rees and Becca Rees. We specialize in making Cricut Project Kits that you can make on your own with your Cricut, learning more about your bug in the process. You just need your Cricut Expression, the required cartridge(s), and a few basic tools. The directions come with a Cricut Cut Chart that shows you line by line exactly what you'll need to cut on your machine, with all of the settings for each cut. There are also well-organized written instructions and color photographs. We pride ourselves on our detailed designs, and on teaching others how to most effectively design with the Cricut. Currently, we have have downloadable directions on sale for only $5, and there are over 50 projects to choose from.
Counter

Grab my Button!
