My BFF - The Bling Queen!
Pink Stamper

Support Team Monique!

Oh My Crafts

Stamps Alive

Hallmark Scrapbook

Everyday Cricut

Obsessed with Scrapbooking

Expressions Vinyl

Lezlye's Ink & Paper

Official Cricut Blog

Thursday, October 17, 2013
It's that time of year again. Ghosts and goblins, vampires and witches, tombstones and skeletons decorating our front lawns. I grew up not exactly going all out for Halloween, so I understand that not all of us celebrate the spooky side of this holiday. But now I'm making up for lost time, and having so much fun decorating the front of my house and getting ready for those trick-or-treaters. My neighborhood is SUCH a blast at Halloween, and I love taking my daughter around to see all of the elaborate set-ups and get too much candy. What are your Halloween traditions?
 So here's my newest layout for you. Directions are available on my Cricut Kits page OR my new Etsy Store! This layout was inspired by the "Creepy" side of this spooky holiday, and I pictured wandering through a graveyard on a dark, foggy Halloween night. This is not where I would want to get lost, that's for sure! Lead me back to the candy, please!
 I do hope you all have had a chance to check out my Etsy store. I just started it last month, and it's really easy to use. Plus, I can easily change prices on some sets of directions to put some on sale for you. So at the very top, there's this new "Creepy" layout, but I'm also featuring a few other Halloween projects which I've marked down for a short time. So check it out! And I went through my nearly 70 projects and marked down some of the simpler, beginner level projects as well. I think you guys will like the Etsy store, as it's really easy to see everything. Let me know what you think!
 As you likely know by now, my directions are very thorough and include my Cricut Cut Chart which shows you exactly what you need to cut on your Expression machine, with all of the settings for each cut. Plus they're grouped by color so it's very efficient. There's also well-organized written instructions and plenty of color photographs. In addition, I'm starting to include more detailed paper information for you, and have also added a new Key# column on my 2 most recent direction sets so that you can find the correct key on your keypad overlay more quickly. I'm always trying to improve how I do things, so I hope that helps! Directions are $5, but don't forget that there are some at a reduced price right now!
 To complete this project as shown, you'll need the following supplies: Cricut Expression®, Happy Hauntings cart, black chalk ink, 3D pop dots, silver or white gel pen, black pen, Diamond Stickles, 4 silver brads, orange and purple rhinestones, plus basic tools and adhesive.
 Have a fun and safe Halloween with your little monsters!


Sunday, September 22, 2013
Hi friends! Just a quick announcement to let you all know that I have opened my store on Etsy - hooray!!! And for a short time, I have featured 4 of my favorite projects at the very top of the store at $3, which is 40% off! Plus, there are 64 others to browse through as well. If you do ever use my Etsy store, I'd LOVE it if you can leave feedback so that others can get a sense of the quality. Oh, and I did list a few of the older, super simple projects at $2 just because they're geared more toward beginners. If you have any input for me or ideas on how to make my store better, please leave a comment here (I'll have to click to approve comments). I'm just learning about this Etsy thing, so I can use all the help I can get. Thanks, everyone!!
Monique Griffith Etsy Store
Monique Griffith Etsy Store
Friday, September 13, 2013
Hey everyone, be sure to see my previous post - there are a few of our older FULL kits available for purchase. Well, I hope you all are doing fantastic and starting to get some glorious Fall weather. My daughter just started 4th grade last week - how time flies!! And now with her back in school, I can't say that I'm sad to have a little extra scrapbooking time on my hands, hehe.
 Well, here's a new layout for you. Directions are on our Cricut Kits page. I started this while on vacation in Oregon a few weeks ago, even though I had not planned on it. But I saw the CUTEST fall paper at a store up there, and then the wheels started turning. Sometimes you've gotta just go where the inspiration leads you, right? So the resulting layout is called "Fall Friends", and it's everything that makes me feel warm and fuzzy about this gorgeous time of year: Apple trees, crunchy leaves, furry critters, pumpkins, and home sweet home. I don't know about you, but I have a ton of fall pictures, but usually find it difficult to put together a cute fall layout - maybe because I don't have a specifically fall cartridge. But as it turns out, I did some digging around and found plenty of perfect fall images on two of my very favorite carts - Create a Critter and Everyday Paper Dolls.

Now, before you freak out and run away screaming, let me tell you that yes, this IS a very detailed layout. BUT there isn't anything truly difficult about it. It just has a lot going on. So as long as you're a little patient, and promise not to hate me, you can do this layout just fine and impress your friends at the crops you go to! And believe me, these will be the best $5 directions you'll ever get. Truly, this would be a nightmare to scraplift because everything is at weird sizes due to how strangely these 2 cartridges are designed. For instance, that big old house is actually cut at 2 3/4". So don't waste truckloads of paper and 8 hours of your time re-cutting things - I've already done it for you! These directions are very, very thorough, have detailed paper info, my usual Cricut Cut Chart, and somewhere around 25 color photos, including lots of close-ups and some step-by-step pics.

Ok, let's talk about paper for a moment, shall we? Paper is a very tricky thing for me as a designer, and for you as a consumer. Paper is like clothing - it comes and goes fairly quickly in and out of stores. It's usually easier to find it online, but even then it will sometimes be elusive, even if it hasn't been out for very long. This new Fall Friends layout uses paper from Doodlebug that is very new, so that should help those of you who like to copy my designs to the last detail.
However, if you ever purchase directions from a while back, and can't find the exact paper - it's ok!! Find something kind of similar either in theme or in color scheme, and do your best to substitute. And as far as the solid cardstock goes, I mostly use Bo Bunny's double dot cardstock because it cuts like butter, and they have fantastic colors. However, you don't need to use the same stuff I use. If you don't have Bo Bunny readily available, you can just gather your patterned papers and take them into any store that sells any brand of cardstock. Then just find a bunch of solids that coordinate. You can use my directions as your guide to make sure that you get a dark brown, medium brown, dark green, medium green, etc. and it will work just beautifully.

So now that we've had our little heart-to-heart discussion, here's the deal. You can get the full directions for $5 for this Fall Friends layout and a bazillion of our other projects on the Cricut Kits page. All directions include Cricut Cut Chart which shows you line by line exactly what to cut on your machine, well-organized written instructions and plenty of color photographs. If you purchase the directions using PayPal, you'll soon get an email with a link so you can automatically download the directions right away. I'm not sure if Google Checkout is still working, as it is being done away with at some point soon. But hey, nearly all of you seem to prefer PayPal, so that shouldn't be an issue.

To complete this project as shown, you'll need the following supplies:
Cricut Expression®, Create a Critter cart, Everyday
Paper Dolls cart, Plantin Schoolbook (or font cart of your choice), dark brown chalk
ink, 3D pop dots, silver or white gel pen, black pen, mini glue dots, tweezers,
green grosgrain ribbon (I used 3/8” wide American Crafts “Spinach” color), plus
basic tools and adhesive. Also Cuttlebug and embossing folders (optional).
Embossing folders I used: Mini Mosaics, Tiny Bubbles and Argyle.

Leave me a comment (I now have to click to approve comments), and tell me what you love most about Fall! I always love hearing from you! And stay tuned because I'm working on a creepy new Halloween layout using the Happy Hauntings cartridge. Plus - don't forget to see my previous post for a few full kits that I'm selling for my good friend.

Well, as you know, I have not had full kits in stock for well over a year. However, as a favor to a very close friend of mine who has had a change in life circumstances, I am offering several of her kits here for sale. Originally, most were $25 + shipping. We'll sell them now for $25, but include free shipping in the United States only. Sorry, but no shipping outside of the US at this time. If you happen to be local to the Sacramento area, and want to pick up, just let me know.
Tropical Escape Layout - Requires Life's a Beach cartridge.

Beautiful U Layout - Requires Home Decor Cartridge.

Built to Play Layout - Requires Robotz Cartridge.

Christmas Morning Layout - Requires Joys of the Season Cartridge + any font.

Cruisin' Layout - Requires Nifty Fifties Cartridge.

Fabulous & Feisty Layout - Requires Paisley Cartridge.

Princess Layout - Requires Once Upon a Princess Cartridge.

Spring Into Action Layout - Requires A Child's Year Cartridge.

Tuff Girl Layout - Requires Rock Princess Cartridge.

Ps. Be on the lookout for another post in the next day or two. I'll be posting my brand new Fall Friends layout, and I think it's safe to say that it's my most detailed design yet.
If you would like to purchase any of these kits or if you have questions, please email me at moniquegriffith@yahoo.com, and I can send you a PayPal invoice. As soon as payment is received, I'll ship your kit(s) within a day or two. If someone else has already claimed the kit, I'll let you know.
Tropical Escape Layout - Requires Life's a Beach cartridge.

Beautiful U Layout - Requires Home Decor Cartridge.

Built to Play Layout - Requires Robotz Cartridge.

Christmas Morning Layout - Requires Joys of the Season Cartridge + any font.

Cruisin' Layout - Requires Nifty Fifties Cartridge.

Fabulous & Feisty Layout - Requires Paisley Cartridge.

Princess Layout - Requires Once Upon a Princess Cartridge.

Spring Into Action Layout - Requires A Child's Year Cartridge.

Tuff Girl Layout - Requires Rock Princess Cartridge.

Ps. Be on the lookout for another post in the next day or two. I'll be posting my brand new Fall Friends layout, and I think it's safe to say that it's my most detailed design yet.
Saturday, August 17, 2013
Hello, friends and wild animal lovers! I hope you all are having a fun-filled summer. Our family has been super busy running around, and I even painted the inside of my house. I'd say it's time for a relaxing day at the zoo now. So here is my newest layout, Jungle Fever, and it would be perfect for pictures of your favorite zoo trip. It would also work great if you've been to Disney's Animal Kingdom or any other wild animal park. This is an intermediate level layout - not too simple, but nothing ridiculously hard, so just about anybody should be able to tame it.

Full directions to this layout (and a zillion more) are available on my Cricut Kits page for $5 each. Directions include my Cricut Cut Chart, which shows you line by line exactly what you'll need to cut with your machine with all of the settings. And cuts are grouped by color so it's nice and efficient. There are also well-organized written instructions, exact mat dimensions, and plenty of color photographs. Plus detailed paper information is also included. If you purchase the directions using PayPal, you'll soon get an email with a link so you can automatically download the directions right away. I'm not sure if Google Checkout is still working, as it is being done away with at some point soon. But hey, nearly all of you seem to prefer PayPal, so we should be fine.

To complete this layout as shown, you'll need the following supplies: Cricut Expression and mat, Animal Kingdom cartridge, George cartridge (or any cart with a circle), dark brown chalk ink, 3D pop-dots, black pen, white or silver gel pen, thin rope or twine, Cuttlebug + Forest Branches (or your favorite) embossing folder, plus basic tools and adhesive. I also used black and brown 1/4" grosgrain ribbon.

Be sure to subscribe to this blog (in the right column under "Get E-mail Alerts") so you'll get email alerts when I post new layouts. I have a few fun ones coming up this fall!

 Ps. One more note for those of you who teach Cricut classes or would like to teach Cricut classes. If you're interested in teaching a class using my directions, please contact me at moniquegriffith@yahoo.com for special pricing on licenses for multiple students.

Full directions to this layout (and a zillion more) are available on my Cricut Kits page for $5 each. Directions include my Cricut Cut Chart, which shows you line by line exactly what you'll need to cut with your machine with all of the settings. And cuts are grouped by color so it's nice and efficient. There are also well-organized written instructions, exact mat dimensions, and plenty of color photographs. Plus detailed paper information is also included. If you purchase the directions using PayPal, you'll soon get an email with a link so you can automatically download the directions right away. I'm not sure if Google Checkout is still working, as it is being done away with at some point soon. But hey, nearly all of you seem to prefer PayPal, so we should be fine.

To complete this layout as shown, you'll need the following supplies: Cricut Expression and mat, Animal Kingdom cartridge, George cartridge (or any cart with a circle), dark brown chalk ink, 3D pop-dots, black pen, white or silver gel pen, thin rope or twine, Cuttlebug + Forest Branches (or your favorite) embossing folder, plus basic tools and adhesive. I also used black and brown 1/4" grosgrain ribbon.

Be sure to subscribe to this blog (in the right column under "Get E-mail Alerts") so you'll get email alerts when I post new layouts. I have a few fun ones coming up this fall!


Friday, May 17, 2013
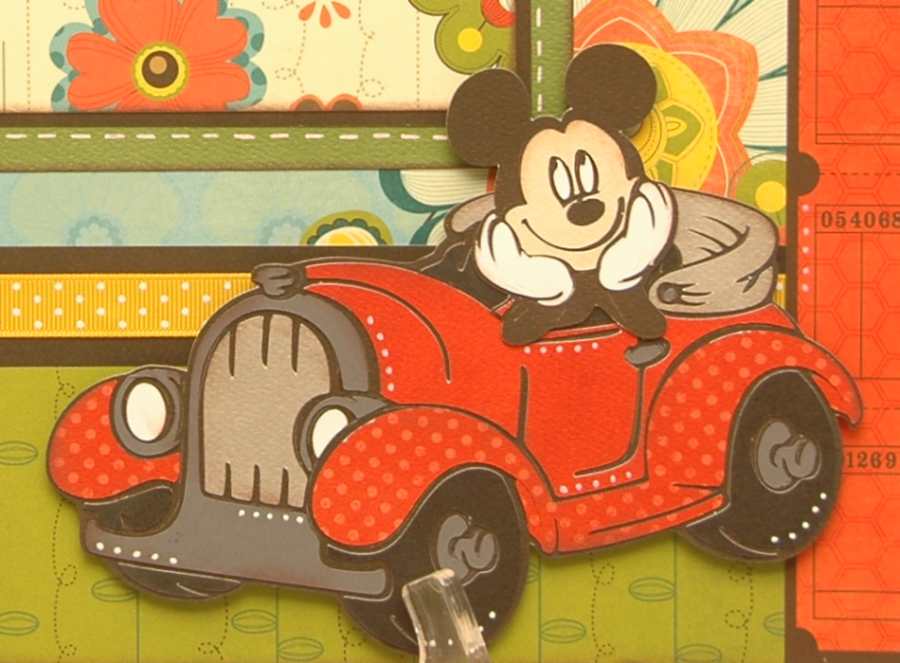
Summer days are finally here (in most parts, anyway). So I've been playing with two of my favorite cartridges, and have created a bright and colorful "Lazy Days" layout that I would love to just hop on into and spend the day there! This is really a pretty versatile layout. It would be great for beach pictures, of course, but also would work for any swimming pool pictures, and of course a fun summer day at the Disney Parks. And hey, if you need an excuse to book a Disney cruise, this just might do it for you, lol! Oh, and one more little note: if you don't have the Mickey & Friends cart, or if you just want a straightforward beach theme, it's quite easy to subtract Mickey and Pluto, and still end up with a great layout.

Full directions to this layout (and a bunch more) are now available on my Cricut Kits page for $5 each. Directions include my Cricut Cut Chart, which shows you line by line exactly what you'll need to cut on your machine with all of the settings. And cuts are grouped by color so it's nice and efficient. There are also well organized written instructions and plenty of color photographs. Detailed paper information is also included. If you purchase directions with PayPal, you'll soon get an email through which you can automatically download the directions right away. Google checkout is also an option, but I do process those by hand, so it may take upto a day or two.


This is a very detailed layout, with a few oddities, but with some time and patience, you shouldn't have too much trouble (I hope!!) To complete this layout as shown, you'll need the following supplies: Cricut Expression®, Life’s a Beach cart, Mickey & Friends cart, dark brown chalk ink, 3D pop dots, white gel pen, black pen, piercing tool, plus basic tools and adhesive. I also used 3 medium silver brads (1/2” diameter) and some blue polka dot ribbon (3/8” wide).


Friday, April 5, 2013
Spring greetings, my Cricut friends! Well, I am in Florida at the moment, enjoying my extended family and the beautiful weather. And hey, I just so happened to have finished writing directions for a couple of my latest layouts. Yup, there are TWO brand new ones!
Speaking of Florida, who doesn't love a fun Disney layout? I know I could use about 20 more as I have so many pictures from various trips and even a couple of Disney themed birthday parties I've thrown. So I present to you my new "Disney Magic" layout... (See below for more details.)

And yes, I know that Spring has sprung (in most parts of the country anyway). So at least now you can feel your fingers enough to scrap all of those snow pictures you took this winter. And this new "Frosty" layout should get you started... (See below for more details.)

Full directions to both of these layouts (and a bunch more) are now available on my Cricut Kits page for $5 each. Directions include my Cricut Cut Chart, which shows you line by line exactly what you'll need to cut on your machine with all of the settings. And cuts are grouped by color so it's nice and efficient. There are also well organized written instructions and plenty of color photographs. Detailed paper information is also included. If you purchase directions with PayPal, you'll soon get an email through which you can automatically download the directions right away. Google checkout is also an option, but I do process those by hand, so it may take upto a day or two.

 To complete the Disney Magic layout as shown, you'll need the following supplies:


Speaking of Florida, who doesn't love a fun Disney layout? I know I could use about 20 more as I have so many pictures from various trips and even a couple of Disney themed birthday parties I've thrown. So I present to you my new "Disney Magic" layout... (See below for more details.)

And yes, I know that Spring has sprung (in most parts of the country anyway). So at least now you can feel your fingers enough to scrap all of those snow pictures you took this winter. And this new "Frosty" layout should get you started... (See below for more details.)

Full directions to both of these layouts (and a bunch more) are now available on my Cricut Kits page for $5 each. Directions include my Cricut Cut Chart, which shows you line by line exactly what you'll need to cut on your machine with all of the settings. And cuts are grouped by color so it's nice and efficient. There are also well organized written instructions and plenty of color photographs. Detailed paper information is also included. If you purchase directions with PayPal, you'll soon get an email through which you can automatically download the directions right away. Google checkout is also an option, but I do process those by hand, so it may take upto a day or two.

Cricut Expression®, Mickey & Friends cart, Mickey
Font cart, dark brown chalk ink, 3D pop dots, white gel pen, Scotch tape, plus basic
tools and adhesive. You’ll
also need ribbon (I used 1/2” width bright yellow with white polka dots
grosgrain ribbon, plus some natural colored twine rope) plus papers and cardstock.


To complete the Frosty layout as shown, you'll need the following supplies: Cricut Expression®, Winter Frolic cart, dark blue chalk
ink, 3D pop dots, white gel pen, brown pen, Diamond Stickles, scallop border
punch (optional), white buttons, light blue ribbon, mini glue dots, plus basic
tools and adhesive. You'll also need papers and cardstock.
By the way, if you're not subscribed to my blog already, you may want to do so if you'd like to get an email notification when I post something new (which isn't quite so often these days). This is different than "following" my blog, and you'll actually need to enter your email address in the "Get Email Alerts" box in the lower right column on my blog.
Thanks for stopping by, and I hope to be bringing your more layout directions again in the near future.
Wednesday, February 13, 2013
Alrighty, my friends. You have waited so patiently, and here it is. A layout based on my very favorite Disney movie - Monsters, Inc.!! This layout would obviously by perfect for pictures you may have taken at the Disney parks. We have the cutest picture of our daughter standing right in front of Boo's door, and it's going to look adorable on here. But even if you've never been to the Disney attraction, you could use this to scrap pictures of your sweet little one asleep in their cozy bed, or dressed as a monster for Halloween, having a popcorn party while watching Monsters Inc., or even playing around at the Disney store.

This layout was created by yours truly. Due to a new and improved healthy life balance, I'm no longer offering full kits with papers, but I do have full directions available for $5 on the Cricut Kits page. The directions include the Cricut Cut Chart, which shows you exactly what you'll need to cut on your machine with all of the settings, and the cuts are grouped by color to make it nice and efficient. There are also detailed, well-organized written instructions and plenty of large color photographs.

To complete this project as shown, you'll need the following supplies: Cricut Expression®, Best of Pixar cart, Kate’s ABCs cart, various chalk inks (colors I used were Aegean Blue, Pink Petunia, Jumbo Java, Perfect Plumeria, Pretty Petunia, Spanish Olive), 3D pop dots, silver gel pen, white gel pen, brown pen, Crop-a-dial or small hole punch, tweezers and/or good dexterity, scotch tape, plus basic tools and adhesive. You’ll also need ribbon (I used narrow medium purple ribbon to hang the doors, plus 3 colors of ¼” grosgrain ribbon: bright green, lavender and soft blue). Plus, of course you'll need various colors of cardstock.

To get these directions (or choose from a zillion others), just pop over to our Cricut Kits page, and it's right at the top. Directions are $5, and if you checkout with PayPal, it'll automatically send you a link to download the directions right away. Google checkout is also available, but since I process those by hand, it may take upto a day to send you the directions.

What Disney or Pixar theme would you like to see next???

If you have any questions at all, you are welcome to email me at moniquegriffith@yahoo.com.


Sunday, February 10, 2013
Testing, testing, 1... 2... 3...
It's been ages since I've posted anything here, so I thought I'd test this out to see if y'all still get notified when I do post. Fingers crossed!
Sooooo, be on the lookout very soon for my newest layout. I've just finished a Monster's Inc. layout, and am writing directions for it so that I'll be able to make them available here on the website soon. If there seems to be a continued demand for Disney layouts, I may wind up doing a few more (directions only - no full kits). Let me know what ya think.
I would love to hear what you all have been upto lately. Around here, life has been crazy busy, but in a good way. I've been focusing on my family and my workouts. Get this - I'm already signed up for a whole bunch of races this year, including a half marathon, various 5k runs, and a couple of triathlons! And I'm happy to report that I've been doing plenty of scrapbooking, but doing it for fun for my own family albums.
Take care, and I'll be posting again soon when the Monsters, Inc. directions are ready!
Monique
Subscribe to:
Posts (Atom)
About Me
- Monique Griffith
- Rocklin, CA, United States
- The Monique Griffith Design Team consists of 4 Cricut Designers: Monique, Wendy Lawrence, Susan Rees and Becca Rees. We specialize in making Cricut Project Kits that you can make on your own with your Cricut, learning more about your bug in the process. You just need your Cricut Expression, the required cartridge(s), and a few basic tools. The directions come with a Cricut Cut Chart that shows you line by line exactly what you'll need to cut on your machine, with all of the settings for each cut. There are also well-organized written instructions and color photographs. We pride ourselves on our detailed designs, and on teaching others how to most effectively design with the Cricut. Currently, we have have downloadable directions on sale for only $5, and there are over 50 projects to choose from.
Counter

Grab my Button!
