
My BFF - The Bling Queen!

Pink Stamper

Support Team Monique!

Oh My Crafts

Stamps Alive

Hallmark Scrapbook

Everyday Cricut

Obsessed with Scrapbooking

Expressions Vinyl

Lezlye's Ink & Paper

Official Cricut Blog

Friday, November 11, 2011
Fall greetings, scrappy friends! It's getting chilly around here - just the right time for a tropical getaway, don't ya think? Well, we've got just the thing for you. Whether you had a relaxing cruise this summer, or you're planning an escape to your favorite tropical paradise for the winter, this new layout kit will be perfect for capturing those sunny memories.

This "Pack Your Bags" layout was designed by the Bling Queen herself, Wendy Lawrence. It's available to purchase on our Cricut Kits page, which can accept PayPal or Google checkout. It's shipping now, and there are only about 15 kits still available as some of our local friends have already snatched them up.

Included with this kit will be all of the patterned papers, cardstock and ribbon that you'll need for the layout. And of course, you'll also get complete directions with our Cricut Cut Chart, which shows you exactly what you'll need to cut on your machine, along with written instructions and plenty of color photos. Plus the photo mats are pre-cut for you to make your life even easier.

To complete this project as shown, you'll need the following supplies: Cricut Expression and mat, Pack Your Bags cartridge, light brown chalk ink (used Gingerbread color), 3D pop dots, white gel pen, brown pen, Diamond Stickles, plus basic tools and adhesive. Optional: Cuttlebug and embossing folders (Swiss Dots and Devine Swirls - or folders of your choice).

You can check out this kit and all of our other available projects on our Cricut Kits page. This complete kit is $25, including directions. Or you'll see the option to order just the directions for $10 and then automatically download them (if using PayPal). If you have any questions at all, just email me at moniquegriffith@yahoo.com.

Tuesday, September 20, 2011
Thanks to everyone for joining us back on the blog last week. It has been fun getting back at it, and we've enjoyed reading all of your comments.
As promised, we have drawn a winner for the Echo Park "Country Drive" paper pack. This is one of my favorite paper sets ever - so happy and sweet with all of my favorite colors!!

And the winner is...
Sandra Joy said...
"Happy Belated Birthday Emily! I'm sure all of her friends had a great time! What a fun project!"
Sandra Joy, please email me your shipping info to moniquegriffith@yahoo.com. Congrats!!
Keep checking back this week for more posts, and more chances to win additional blog candy!
Sunday, September 18, 2011


The measurements are as follows:
Cake - 3 1/4"
Font - 2"
Polka Dot Mat - 4" x 5 1/2"
Green Mat - 4 1/2 x 5 3/4"
Card - 6 1/2" x 10" (fold in half)
Ribbon - 5 1/2"
I cut (2) cakes for this card so I could use one to create a shadow by "offsetting it". Before attaching the cakes together I ran it through my Cuttle Bug using a "swirly" type embossing folder. Any design will work. After chalking it with purple chalk ink I layered the cakes and attached it to the card with pop dots. After cutting the mats I chalked all sides with brown chalk ink. I love what a little chalk can do. It just makes it pop! Then I layered my pink ribbon and my green ribbon and attached it using basic adhesive.
To complete this card you will need:
Birthday Bash cart
Summer in Paris cart
Cuttle Bug folder (any"Swirly" shape)
Green and pink ribbon
Pop Dots
Basic tools and adhesive
Purple and brown chalk ink
White gel pen
Rhinestones
*Don't forget to leave a comment today for your chance to win some yummy blog candy. Oh, and Monique will be picking a winner for last weeks blog candy. So stay tuned my friends, and have fun creating. Ta!
Thursday, September 15, 2011
Happy Friday, friends!! Monique here. I hope you've all had a wonderful week and are looking forward to your weekend.

Ok, we all know that shoe-themed cards are very popular (who doesn't love a cute pair of shoes, right?), but instead of the usual high-heeled shoe design, I went with a running shoe on this card. My very good friend Stephanie had a birthday on Monday, and I'd been wanting to make her this card because she was really hoping to get $ toward a new pair of running shoes for her birthday.

The running shoe was cut at 3" from the Pink Journey cartridge. However, the cut on the cartridge has no layers or shadow or anything. So I first cut it out in hot pink, trimmed off the shoelace part of the image, and then attached the shoe to solid white cardstock. I then hand-trimmed the white cardstock, essentially creating a 1/8" shadow around the shoe. Then I cut the shoe again, but this time in black. Using scissors, I trimmed away the sole of the shoe, and attached it to the pink shoe. I also saved the little "hole" pieces that you'd normally throw away, and I just glued them inside the spaces in the pink shoe. The cool skull image was cut from Indie art at 1". Had to go with skulls for Steph! Finally, I used my Crop-a-Dile to punch holes in the shoe, and then threaded white ribbon through the holes and tied a bow. The sentiment was just hand-written with a silver Signo pen.

Stephanie and I and our friend Erin are doing triathlon training with a group, including coaches. We meet 3 times per week for killer workouts all around town, plus do workouts on our own an additional 3 days/week. We've been working on swimming, biking, and running, and are planning to compete in the Golden State Triathlon in Sacramento on October 9th. It'll be a 1/2 mile swim (harder than it sounds!), 15 mile bike ride, and 3 mile run. This is quite a stretch for me as I only started exercising about 3 months ago after almost a year of cancer treatments, and even before that I wasn't doing anything physical, so I was in BAD shape!!! But I have come really far with training. I can now swim more than the needed 1/2 mile in a super cold lake (though slowly), I'm decent at biking, and had 1 stretch of 23 miles, and I'm even getting better at running. I think I might be able to run my first continuous mile very soon - I'm getting close, and have NEVER done that in my whole life. It's amazing what you can accomplish with hard work, isn't it? So that's a big reason that I've fallen a bit behind with blog posting and whatnot. I've really been focusing on my health. Oh, and I've also dropped about 30 pounds in the past 9-12 months - woohoo! All of my clothes are getting too big! It's an empowering feeling to be somewhat back in charge of my own body, and to know that I'm not too old to get in shape and accomplish something as crazy as a triathlon. And that goes for the rest of you too. It's never too late to get off that couch!
Don't forget to leave a comment on today's post for a chance to win this week's blog candy - the Echo Park "Country Drive" paper pack. See ya again soon!

Hi everyone! It's Becca and I'm here to share this cute little card with you that I made using the Create a Critter cartridge. I just LOVE this cart! This "Wild" card can be used for any occasion. Hence, the "wild card". I used it as a birthday card for my father-in-law and he loved it. The solid card stock is from Bo Bunny. One of my favorites for sure. The patterned paper's from Basic Grey. The measurements are as follows:
Giraffe - 5"
"Wild" - 1 3/4"
Leaf -3"
Flower - 1"
Cloud - 3/4"
Dark Green Mat - 5 x 6 1/2"
Patterned Mat - 4 1/2" x 6"
This cute little giraffe is gonna need a bow. Isn't he cute? He wears it well!

To complete this card you'll need basic tools and adhesives, the cartridge listed above, brown brad, brown chalk ink, and green ribbon. Have fun creating!
Oh, and don't forget to leave a comment so you can be entered to win our yummy blog candy. Monique will draw the lucky winner who will receive Echo Park's Country Drive paper pack. Be sure to stop back by tomorrow to see more fun stuff and enter again. Fun fun!
Monday, September 12, 2011
Hi Everyone! Monique here. Thought I'd check in and say hi and post a little something just for fun. Around here, September is birthday season. My little Emily just turned 7 on September 1st, and she wanted a Disney Pluto birthday party. Umm, yeah, just try looking around the internet to see how much Pluto birthday stuff is out there. VERY little!! Good thing my trusty Cricut is friends with the Disney gang. We whipped up this snazzy banner in no time, and it was just the perfect touch for the party. It was kind of a group effort, actually. I designed it, Wendy cut it out, I assembled it, and then Nana Susan helped with the flower placement. It takes a village sometimes.
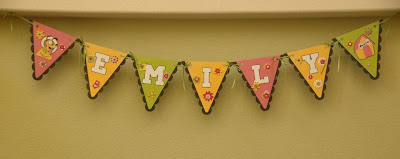


We used Bo Bunny cardstock, of course (yum!). The banner pieces were cut from the Birthday Bash cart using Fit to Page, so they'd be max size. The font was also Birthday Bash. And of course, Pluto and the dog house were from Mickey and Friends. I strung it together with green ribbon, and added a whole bunch of silk flowers and buttons to girly it up a bit. We had such a fun birthday party here with Emily and 25 of her closest friends playing party games and eating birthday cupcakes. I love my girl!!

Don't forget to leave a comment on today's post for another chance to win an Echo Park paper pack - "Country Drive". This is gorgeous paper - one of my very favorite lines I've seen in a long time!
Tuesday, September 6, 2011
GREETINGS EVERYONE!
It's Susan here and I have some great things to fill you in on!
It's Susan here and I have some great things to fill you in on!
First from the whole team we want to say
" YAY! We are happy to be back! "
Monique, Susan, Becca and Wendy
(We'll all be posting this week!)
The summer has been great but fall is even better and we are all ready to roll. Monique's focus on family, relaxation and health has paid off and we'll be posting some pictures soon to prove it! " YAY! We are happy to be back! "
Monique, Susan, Becca and Wendy
(We'll all be posting this week!)
Watch for Monique's post & creations tomorrow!!


NEW KIT & IT'S A CLASS TOO! "SCHOOL DAYS" by Nanasusan
Bursting with warm fall colors,
this nostalgic layout is ready to frame your little ones
and capture their back to school experience.
I LOVE this time of year!
Join us September 22 at 6pm-10pm.
(1879 Butterfly Ct. Rocklin, CA)
You'll enjoy light snacks, learning to make these cute flowers,
and a fun evening. See the Cricut Kits page to buy the class, kit or just directions.
To make this kit you will need the Cricut Expression, "A Child's Year" cartridge,
bro wn chalk ink,pop dots, adhesive, small hole punch, thread and basic tools.
bro
 wn chalk ink,pop dots, adhesive, small hole punch, thread and basic tools.
 Kits, just the kit directions, and the CLASS
which includes the directions
are available now for purchase
on this blog -see Kits tab at the top.
You'll want to sign up now for the class as there is limited space.
Don't forget to leave a comment for
a chance to win
Echo Park "Country Drive" paper pack
and come back tomorrow through Friday to see new designs
and leave comments all week. Each new day you leave a comment
gives you another entry in the drawing.
Tuesday, August 23, 2011
Guess what! We have TWO new layouts to share with you today, and they're both kits. Either of these new kits can be ordered from our Cricut Kits page, which can accept PayPal or Google checkout. There's also the option to order just the directions, and then you can automatically download them. If you'd rather pay by check, just email me your order at moniquegriffith@yahoo.com and let me know your state or zip code.
The first kit, "Go Wild" is by Becca Rees and uses the super fabulous Create-a-Critter cartridge. Isn't this just the cutest layout? It would be perfect for pics of a zoo day, or the kiddos monkeying around at the park - or even for a day at Disney's Animal Kingdom. (Oh, and don't forget to see below for the winner of last week's blog candy!)

Included with this kit will be all of the patterned papers, cardstock and ribbon needed to complete the layout. You'll also get our detailed directions with Cricut Cut Chart that shows you line by line exactly what to cut on your machine, with all of the settings. The directions also include well-organized written instructions and several color photographs.

To complete this project as shown, you'll need a Cricut Expression and mat, Create-a-Critter cartridge, chalk inks in the following colors: dark brown, blue, orange and purple, 3D pop dots, white gel pen, black pen, Diamond Stickles, plus basic tools and adhesive. Cuttlebug and Divine Swirls embossing folder are optional.

Next up is "The Simple Life" layout, designed by me (Monique). Wouldn't you love to just jump into this layout and live there for a week without a care in the world? Ok, unless that means getting up at 4:00am to milk the cows.

As with our other kits, this one will include all of the papers, cardstock, and ribbon needed to complete the layout. And by the way, we also pre-cut some of the background strips and the photo mats for you. Of course, you'll also get full directions with cut chart and lots of color photographs.

To complete this project as shown, you'll need the following: Cricut Expression and mat, Country Life cartridge, dark brown chalk ink, 3D pop dots, white gel pen, black pen, stapler, plus basic tools and adhesive. Cuttlebug and embossing folders (Divine Swirls and Tiny Mosaic) are optional but helpful.

Either of these new kits can be ordered from our Cricut Kits page. The complete kits are each $25, which includes full directions. Or you can order just the directions for $10 and then download them automatically. Both kits are ready for shipping NOW. If you have any questions, just email me at moniquegriffith@yahoo.com.
And finally, we have a winner for last week's blog candy! Please email me at moniquegriffith@yahoo.com with your shipping address, and I will send you the brand new "The Simple Life" kit (shown above). Congrats!
Shelley said...
Glad to see you guys posting again! :) Love the new layout! You are both so talented! Like mother, like daughter! :) Thanks for the chance to win as well. Take care!
Shelley
http://carleys-closet.blogspot.com
shelleymace21@gmail.com
Thursday, August 11, 2011
As promised, here is the nifty new layout by Nana Susan. She has been busy creating this summer! This layout IS a kit, and is available for shipping now! To order, just go to our Cricut Kits page to use our shopping cart. Or you can just purchase the directions and download them automatically.

This rockin' retro layout would be perfect for older pics from the 50's, or even pics from a modern sock hop or just a night out getting milkshakes at your favorite diner. The kit will include all of the patterned papers, cardstock, and ribbon that you'll need to complete the layout. Plus you'll get our detailed directions with Cricut Cut Chart that shows you line by line exactly what you need to cut on your Cricut with all of the settings for each cut - and plenty of color photos to help you out.

To complete this project as shown, you will need the following supplies: Cricut Expression and mat, Nifty Fifties cartridge, charcoal or black chalk ink, 3D pop dots, white gel pen, Diamond Stickles, Gold Stickles, plus basic tools and adhesive. Cuttlebug and embossing folders are optional.

The complete kit with full directions is $25, and can be ordered from our Cricut Kits page. Or you can purchase just the directions for $10, and then download them automatically in pdf format.

And by the way, we have now added some of the other newer directions sets to our shopping cart, so be sure to check it out. If you have any questions at all, you can email me at moniquegriffith@yahoo.com.

Be sure to leave a comment for a chance at some fabulous blog candy. You could win my new kit, "The Simple Life", which is coming out very soon and uses the Country Life cartridge. And keep an eye on the blog for more on the way!

Be sure to leave a comment for a chance at some fabulous blog candy. You could win my new kit, "The Simple Life", which is coming out very soon and uses the Country Life cartridge. And keep an eye on the blog for more on the way!
Saturday, July 30, 2011
Hello, crafty friends! Monique here. Sorry it’s been so long since we’ve posted on the blog. The summer started off with a bit of a health scare for me, which thankfully turned out to be fine. But I also figured out that it was imperative for me to take some time off immediately for my mental and physical well-being, and work on finding a healthier balance in my life. So I have been spending lots of time with my little girl, hubby, and the rest of my family and friends, relaxing and traveling, and exercising a lot. (I’m even training to do a triathlon in October. Crazy, but fun!) It’s been a really incredible summer, and it took that little health scare to shake me up and realize that I need to be spending the bulk of my time a bit differently.
Now what? Well, now that you know I haven’t actually fallen off the face of the planet, I think you also may be pleased to know that the design team and I have been busy the past month. We each have a layout kit to release very, very soon. We’ll start it off in the next few days with Susan’s “Cruisin” layout, which uses the Nifty Fifties cart. Then Becca will introduce her adorable “Go Wild” layout, using the Create-a-Critter cart. Next up will be my new farm-themed layout “The Simple Life”, which uses the Country Life cart. And finally, Wendy will make a splash with her “Pack Your Bags” layout, using the Pack Your Bags cart, of course!
We won’t be posting daily as we were previously doing, but we’ll at least try to post a couple of fun things each week, and a giveaway now and then too. Whatever we can do while still maintaining some healthy life balance!
Thank you so much for all of your patience and understanding, and to those of you who dropped me an email to check on me. Things are going much better now!! I’d love to hear from you all. Leave me a comment and let me know what you’ve been up to this summer – or if you still have some exciting plans before school starts up again.
 |
| Jared, Emily and me with Goofy at Disneyland in June. What a great family trip this was with the 3 of us, and now I can't wait to go again! It was so much fun to feel like a little kid. |
Now what? Well, now that you know I haven’t actually fallen off the face of the planet, I think you also may be pleased to know that the design team and I have been busy the past month. We each have a layout kit to release very, very soon. We’ll start it off in the next few days with Susan’s “Cruisin” layout, which uses the Nifty Fifties cart. Then Becca will introduce her adorable “Go Wild” layout, using the Create-a-Critter cart. Next up will be my new farm-themed layout “The Simple Life”, which uses the Country Life cart. And finally, Wendy will make a splash with her “Pack Your Bags” layout, using the Pack Your Bags cart, of course!
We won’t be posting daily as we were previously doing, but we’ll at least try to post a couple of fun things each week, and a giveaway now and then too. Whatever we can do while still maintaining some healthy life balance!
Thank you so much for all of your patience and understanding, and to those of you who dropped me an email to check on me. Things are going much better now!! I’d love to hear from you all. Leave me a comment and let me know what you’ve been up to this summer – or if you still have some exciting plans before school starts up again.
Friday, June 17, 2011
Happy Friday! shelly here today . WOW i was so honored when wendy approached me about being guest designer for this month. i havent had the pleasure of meeting her or monique who i hear are just the sweetest but we live about 2 hours away so a visit is in the future.
thank you so much monique and wendy for thinking my crafty abilities are worthy.
for my project i made a card which is what i normally post on my blog. i do layouts too i just rarely share them.
i didnt make this card for any one specific person.. i made it for us all.. a reminder to NEVER lose yourself in someone or something so much that you lose yourself.
so now for the card..


for this i used walk in my garden (caterpillar) doodle charms (jar adding foam stickies behind for depth) and zoobaloo (branches and leaves. i bent one of the branches slightly and only adhered the top and bottom portions again for depth . pic 3 shows this)
wimg and d/charms were the first image carts i purchased, they are still my go to favorites.
i added stamped butterfly images, stickles, liquid pearls ,martha stewart border punch and colorbox fluid chalk.
thank you so much for your comments and thank you again monique and wendy for making me feel special :) have a great day and a fun weekend! happy crafting :) shelly
Friday, June 3, 2011

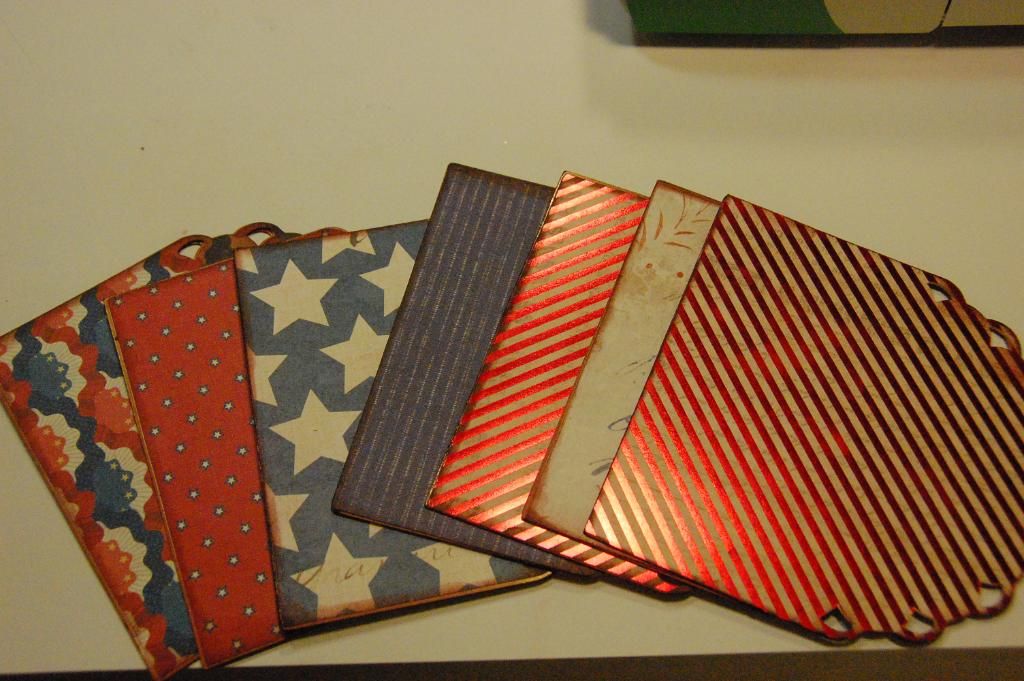
The base of the album is made using Elegant Edges. I cut the pages at 5.24 inches (Real Size Off). The paper is from K & Co Americana collection. This collection is awesome. I found it at Joann's. It is double sided and so full of yummy patterns! Once I attached all my papers to the album pages, I inked the edges with Chestnut Color Box ink. This particular shade of brown has a bit of a rust tone with really compliments the paper.

Next I bound the album with my Cinch.
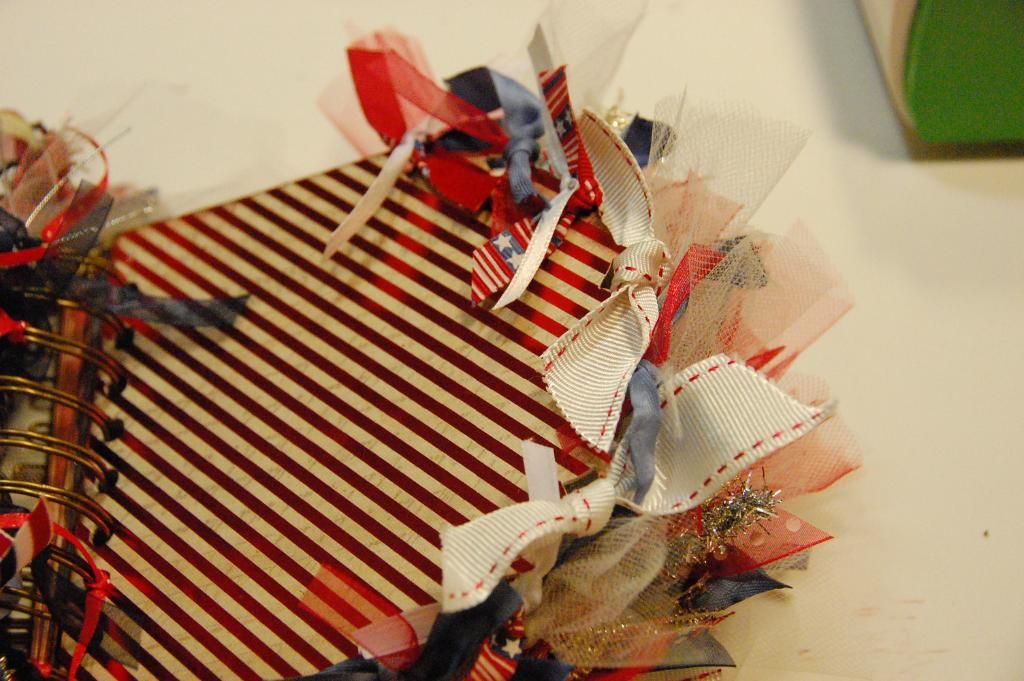
Then I began tying ribbons from my stash along the sides and the edges.

I kept tying until I felt like the album was full.

usually on my minis I like to have pockets and tags. But this one I did a bit different. I made a few of these straps out of thick ribbon to tuck pics and stuff into. I wrapped the ribbon tight and sealed to itself with ATG tape.

I then tied a flat bow and hid the seam. The ribbon is not attached to album. it is loose and can be lifted on both sides. I really love how this turned out!

Next I began cutting with nippers the back of these brads off. by cutting the back portion off, the brad will lay flat on my album. I used these on several pages and on the cover.

On the cover I used Pink By Design Stamps in Red, White and Blue to stamp the sentiments. I started with a red trimmed white grosgrain ribbon.

Using Archival Ink, I stamped the three sentiments to create a border. Stamping on fabric and ribbon is super easy and a great way to incorporate stamps into your project.

Since the ink dries pretty quick on fabric, I could add it to my cover using Terrifically Tacky Tape. Another feature on the cover I want to point out is the red metal spindle. I found this in a garage sale for a stamping store here in Kansas City. I always look for hardware items to add a bit of interest to my projects. To hide the hole in the spindle, I added a rhinestone. The font on the front is actually a phrase from Cricut Stand and Salute. The shadow layer and the sentiment are cut at 1.15 inches (Real Size Off). I also added some red white and blue pom poms. I found these at Joann's.
So do you want to see this inside pages?!?! I have both photos and video to share today.
I have a video of the this mini in action here:
If you are reading this on the blog, there is not need to click this link. It is for the readers who subscribe through Feedburner since Feedburner does not always add videos.

Here are the inside pages. I have made some notations about some pages and features. The bottecap on the left is from my stash.


The photo mats are all cut at 3.5 for base and 3.25 for top layer. On the right, I used some manila paper and stamped with Pink by Design Let's Write Backgrounder.


The stitching on these two mats are done with Paper Pizzaz Easy Stitcher. I used a White Signo Pen to the stitching. The Easy Stitcher is a a stencil that allows you to draw really straight stitching. I only wish I could draw that straight!

I love minis that become a part of my home decor. This one is no exception. It stand beautifully and can display all photos of my kiddos enjoying the holiday.

I want to thank you so much for looking through my album. This mini was so much fun to make. Now if you want the free Gypsy File, please visit my personal blog at 217 Creations.
I always appreciate the time it takes to leave a comment and to follow or subscribe both here at Monique Griffith Designs and on my blog 217 Creations. Have a great day!

Subscribe to:
Posts (Atom)
About Me
- Monique Griffith
- Rocklin, CA, United States
- The Monique Griffith Design Team consists of 4 Cricut Designers: Monique, Wendy Lawrence, Susan Rees and Becca Rees. We specialize in making Cricut Project Kits that you can make on your own with your Cricut, learning more about your bug in the process. You just need your Cricut Expression, the required cartridge(s), and a few basic tools. The directions come with a Cricut Cut Chart that shows you line by line exactly what you'll need to cut on your machine, with all of the settings for each cut. There are also well-organized written instructions and color photographs. We pride ourselves on our detailed designs, and on teaching others how to most effectively design with the Cricut. Currently, we have have downloadable directions on sale for only $5, and there are over 50 projects to choose from.
Counter

Grab my Button!
