
My BFF - The Bling Queen!

Pink Stamper

Support Team Monique!

Oh My Crafts

Stamps Alive

Hallmark Scrapbook

Everyday Cricut

Obsessed with Scrapbooking

Expressions Vinyl

Lezlye's Ink & Paper

Official Cricut Blog

Thursday, April 14, 2011
What???? That's a perfectly fitting name for this lovely set of cards. How on earth could you describe these cards with just one or two words? Believe me, we tried, and it just didn't work.

These cards were made with the oh-so-versatile Wild Cards cartridge. There are 5 cards with 5 coordinating envelopes, for multiple occasions. This is a kit, and was designed by Becca Rees. Doesn't she do some fantastic work? She's only making 25 of these kits, so they won't be around for very long, and this is a GREAT way to learn how to use Wild Cards, which can be kind of a tricky cartridge if you're not familiar with it. To order, email me at moniquegriffith@yahoo.com. See below for details...

The kit will include all of the patterned papers, cardstock and ribbon that you need to create the 5 cards and 5 envelopes. You'll also get detailed, yet easy to follow directions with our Cricut Cut Chart that shows you line by line exactly what you'll need to cut on your machine, with sizes and settings for each cut. Plus there are well-organized written instructions and plenty of color photographs.

To make this project as shown, you will need the following supplies: Cricut Expression and mat, Wild Cards cartridge, dark brown chalk ink, 3D pop dots, white gel pen, brown pen, Diamond Stickles, ruler and scoring bone, glue pen, plus basic tools and adhesive.

The complete kit is $25, or you can always order just the directions for $10. Shipping is available and ranges from $5 in California to $6-$9 in the rest of the US, depending on location. We're happy to combine shipping, and you won't pay over $10 combined shipping, even if ordering multiple kits. This might be a great option for those of you who ordered the Toy Story kit, R is for Rabbit, or the Elegant Cards. This Springy Sunshine Blossoms of Life Flowing Through the Bubbly River of Breezy Happy Moments Card kit (whew!) will be ready to ship April 28th.

To order, just email me at moniquegriffith@yahoo.com. Include the name of the kit(s) you'd like (ok, I'll let you abbreviate the name just this once!), your state or zip, and preferred payment method (PayPal or check).


And don't forget to leave a comment here on the blog for Becca today, and it will enter you for this week's blog candy, which is a collection of 5 Liquid Pearls and 5 Stickles. Yummy!!

These cards were made with the oh-so-versatile Wild Cards cartridge. There are 5 cards with 5 coordinating envelopes, for multiple occasions. This is a kit, and was designed by Becca Rees. Doesn't she do some fantastic work? She's only making 25 of these kits, so they won't be around for very long, and this is a GREAT way to learn how to use Wild Cards, which can be kind of a tricky cartridge if you're not familiar with it. To order, email me at moniquegriffith@yahoo.com. See below for details...

The kit will include all of the patterned papers, cardstock and ribbon that you need to create the 5 cards and 5 envelopes. You'll also get detailed, yet easy to follow directions with our Cricut Cut Chart that shows you line by line exactly what you'll need to cut on your machine, with sizes and settings for each cut. Plus there are well-organized written instructions and plenty of color photographs.

To make this project as shown, you will need the following supplies: Cricut Expression and mat, Wild Cards cartridge, dark brown chalk ink, 3D pop dots, white gel pen, brown pen, Diamond Stickles, ruler and scoring bone, glue pen, plus basic tools and adhesive.

The complete kit is $25, or you can always order just the directions for $10. Shipping is available and ranges from $5 in California to $6-$9 in the rest of the US, depending on location. We're happy to combine shipping, and you won't pay over $10 combined shipping, even if ordering multiple kits. This might be a great option for those of you who ordered the Toy Story kit, R is for Rabbit, or the Elegant Cards. This Springy Sunshine Blossoms of Life Flowing Through the Bubbly River of Breezy Happy Moments Card kit (whew!) will be ready to ship April 28th.

To order, just email me at moniquegriffith@yahoo.com. Include the name of the kit(s) you'd like (ok, I'll let you abbreviate the name just this once!), your state or zip, and preferred payment method (PayPal or check).

Speaking of cards - I have a little request for those of you big-hearted card makers out there. This is something little that you can do, but will make a big difference. My very good friend, Brenda, has a son - Greg - who is in the military, and we would really like to let him know how much he is appreciated. Brenda has had a very difficult year and faced tragedy that I pray none of us will have to face in our lifetime, and this is something that would mean so much to her. If you are able, please join me in sending a card to her son to thank him for his service. Here is his address...
SR Riley, Gregory
SHIP 12 DIV 158
Recruit Training Command
3515 Sailor Drive
Great Lakes, IL 60088-3515

And don't forget to leave a comment here on the blog for Becca today, and it will enter you for this week's blog candy, which is a collection of 5 Liquid Pearls and 5 Stickles. Yummy!!
Tuesday, April 12, 2011
Happy Wednesday!!!!
Well I pulled out some old pictures..This is my 19 year old daughter. Wow-Times flies.

 Paper used was Olivia by Basic Grey. I decided to do something a little different. I added a 8x8 piece from the coordinating paper and added various sizes and colors to add on top of the 8x8 to give a different look. And added my pictures without mats but used pop dots to bring them off the paper a little.
The cartridge used for flowers was "Mother's Day" and Hannah Montana for the letters. I used my itop to create my own brads. (A few of the stickers were from the paper pack)
Pop over to my blog for more pictures by clicking HERE
Don't forget to leave a comment for Monique so you are entered for some fabulous blog candy...
Thanks so much,
Wendy-Bling Queen
Well I pulled out some old pictures..This is my 19 year old daughter. Wow-Times flies.


The cartridge used for flowers was "Mother's Day" and Hannah Montana for the letters. I used my itop to create my own brads. (A few of the stickers were from the paper pack)
Pop over to my blog for more pictures by clicking HERE
Don't forget to leave a comment for Monique so you are entered for some fabulous blog candy...
Thanks so much,
Wendy-Bling Queen
Greetings, everyone! Today, I am excited to get to show you the latest project by Nana Susan, "Elegant Cards". She has been working on this one for a while now, and I just think it is the most GORGEOUS set of cards I have ever seen! Not to mention the bustier gift box - how amazing is that??? This is a kit, and it's also a class for those of you in the Northern California. The class date is May 3rd from 6-10pm, and then kits will be ready to ship out shortly after - probably around May 10th. To order, email me at moniquegriffith@yahoo.com. Include the name of the kit you'd like, your state, and preferred payment method (PayPal or check). See below for all of the details and pics.

And don't forget to leave a comment today for Nana Susan, and that will also enter you for a chance to win this week's blog candy - 5 bottle of Liquid Pearls and 5 bottles of Stickles!

This chic and elegant card set and gift box uses the Summer in Paris cartridge. Ooh-la-la! The kit will include the pre-cut box (so you won't have to have the Tags, Bags, Boxes cart and long mat), plus you'll get all of the beautiful patterned papers, ribbons, flowers, pearls, and envelopes for your cards. You'll also get directions with Cricut Cut Chart, easy to follow written instructions and plenty of color photographs.

To complete this project as shown, you will need the following supplies: Cricut Expression and mat, Summer in Paris cartridge, distressing ink (black or dark purple or dark blue will do), decorative border punch (optional), scoring bone and ruler, hole punch, stapler, 3D pop dots, plus basic tools and adhesive.

This complete kit is $25, or you can always purchase just the directions for $10. If you do order just the directions, keep in mind that you'll need the Tags, Bags, Boxes cart and a 12x24 mat in addition to the supplies listed above. Shipping is available, and ranges from $5 in California to $6-$9 in the rest of the US, depending on location, and we're happy to combine shipping if you're purchasing other kits.

If you are in the Northern California area, we'd love to have you sign up for this class on May 3rd. It will be here at my home in Rocklin from 6-10pm, and you'll get a fun night out plus hands-on help with your project. The class is already half full, even before anyone has seen this project, so I'm guessing it'll fill up quickly.

To order, just email me at moniquegriffith@yahoo.com. Include the name of the kit you'd like to order, your state, and preferred payment method (PayPal or check). You might even want to order 2. I can't tell you how many people tell me that they buy a cute "gift" project like this, but then can't stand to give it away, LOL!

Have a wonderful day!!
Monday, April 11, 2011
Welcome to Monday! I hope you all had a restful weekend, and got to do something you enjoy. I sure did. On Friday, I picked up my little Emily from school at noon, and we had a mommy/daughter date, which was lunch and a movie. We saw "Hop" - so cute! Then the weekend was spent scrapping for fun and hanging out with the fam. Well, the "scrapping for fun" consisted of me playing with the new Kate's ABCs cartridge that I just got, along with some beautiful Basic Grey and Bo Bunny papers. And this is what happens when you combine an amazing cartridge with gorgeous papers. So just before posting this, I decided that I would go ahead and turn this into a kit. You can blame Nana Susan for that because she's the one who talked me into it. To order, email me at moniquegriffith@yahoo.com. Include the kit, your zip, and preferred payment method (PayPal or check). See below for details (and blog candy too!)...

I'm just going to make a very limited number of these because it is a pretty new cartridge that not everyone has yet. But if you have a little girl, a niece or a granddaughter, this is an absolute must-have cartridge - you will LOVE it!!! I think it may still be a JoAnn's exclusive, but don't quote me on that. If you like this kit, and you're planning to get this cart, I'd recommend that you order this kit now while it's in stock because I'm not making very many, and you can always get the cart later if you want.

This layout would be great for any Spring or Easter pics of your sweet little one. I am planning to get my little Emily a brown Easter bunny, just so I can have some cute pics for this layout - is that crazy or what? Please tell me I'm not the only one who does things like that, LOL! The kit will include all of the patterned papers, cardstock and ribbon that you need to complete the layout (there's a LOT of paper involved here - the background alone takes 8 sheets - yikes!). The photo mats will be pre-cut for you, and you'll get full directions with Cricut Cut Chart, well-organized written instructions and plenty of color photographs. If you'd like to see how our kits work, you can see a video HERE.

Supplies you'll need to make this project as shown: Cricut Expression and mat, Kate's ABCs cartridge, dark brown chalk ink, white gel pen, brown pen, 3D pop dots, scalloped border punch, Ranger Liquid Pearls (Buttercup yellow and Petal Pink), plus basic tools and adhesive.

The complete kit is $25, or you can always purchase just the directions for $10. Shipping is available, and ranges from $5 in California to $6-$9 in the rest of the US, depending on location. Combined shipping is available. These should be ready to ship by April 28th. To order, just email me at moniquegriffith@yahoo.com. Include the name of the kit you'd like, your state or zip, and preferred payment method (PayPal or check).

Be sure to check in tomorrow. I'll be posting Nana Susan's latest kit - Elegant Cards. Oh. My. Goodness. Her project is sooooooooooooooo exceptionally beautiful - I can hardly wait to show it to you!!!!!

Hmmm, does anybody around here like blog candy? How about a nice little assortment of Ranger's Liquid Pearls and Stickles? Those are a staple to scrapping life! Just leave a comment here on this post, and then come back each day this week for more chances!

Sunday, April 10, 2011
Announcing the winners of this past week's blog candy. Ok, I said I'd pick 2 winners, who would each get to pick FIVE sets of full directions ($50 value). Well, I decided to pick an extra one from those of you who added my button to your blogs - so thank you for doing that!! Here are the winners...
Peg Toth said...
that is just too cute. I'm reading Toy Story to my grandson now. Thanks!
valerie said...
Just beautiful! Thanks for sharing your talent.
Valerie
vharrison 902 at gmail dot com
Faye's Crafti Corner said...
Added your button to my blog :)
http://fayescrafticorner.blogspot.com/
Congratulations to the three of you!! Please email me at moniquegriffith@yahoo.com to claim your blog candy.
Friday, April 8, 2011
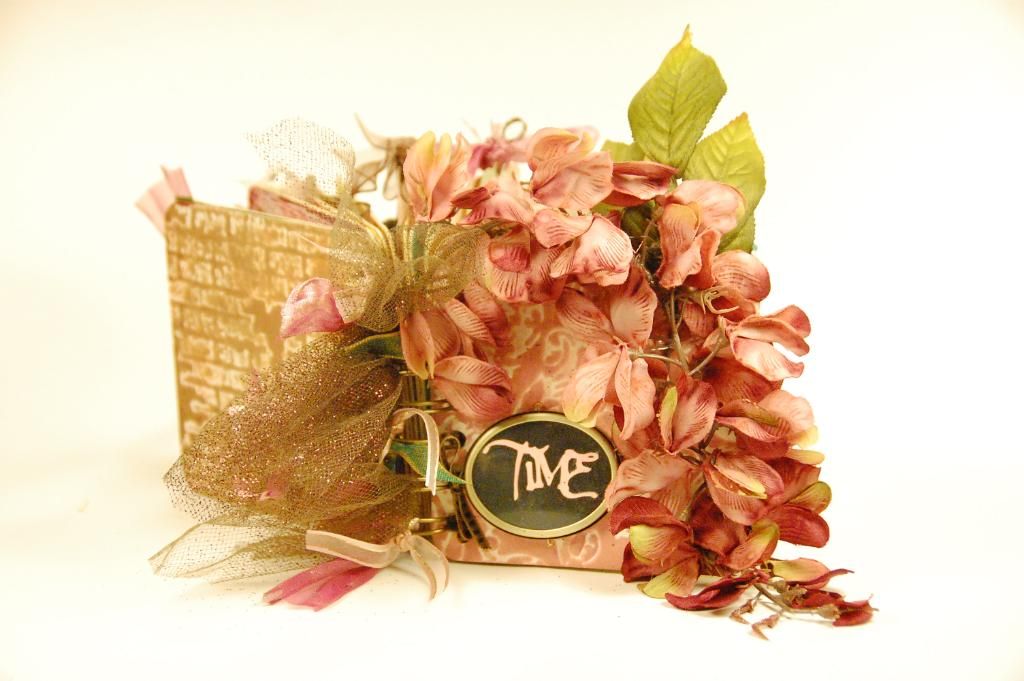
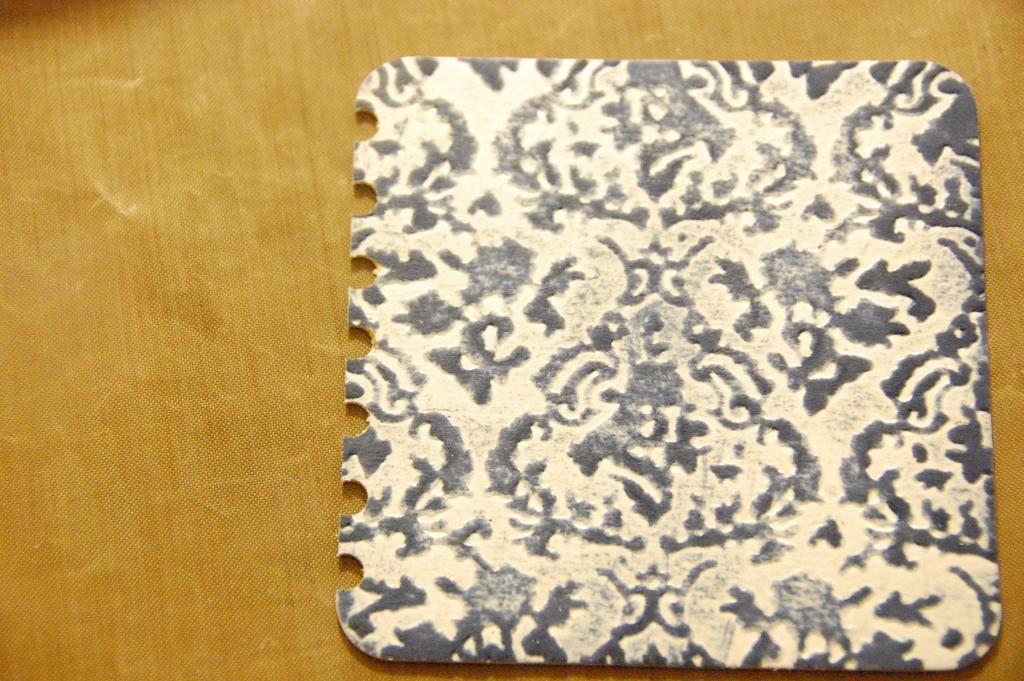
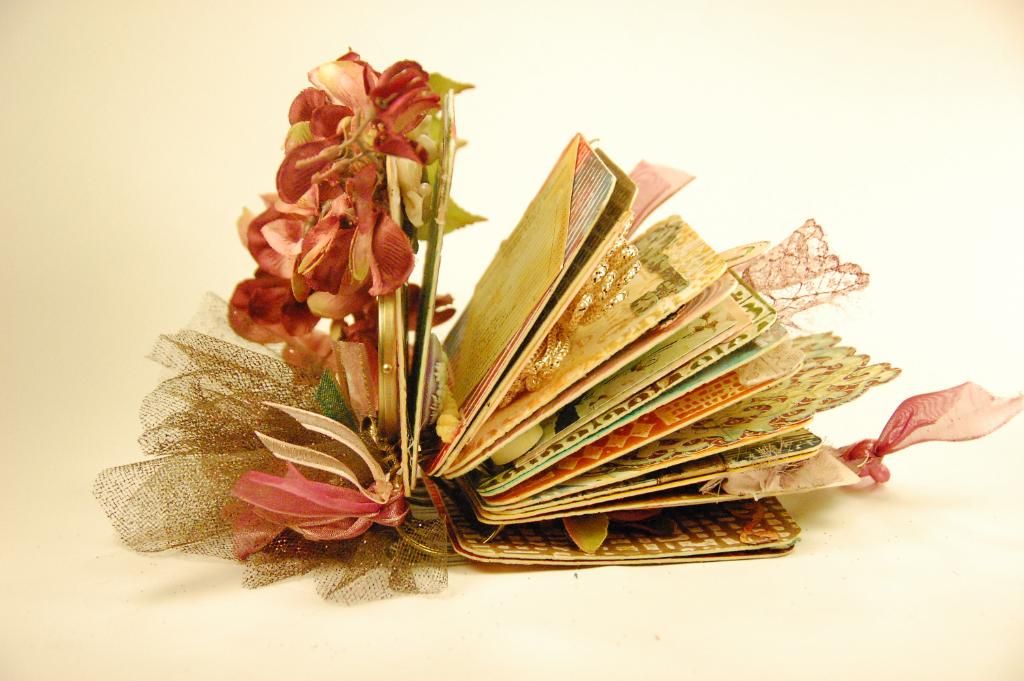
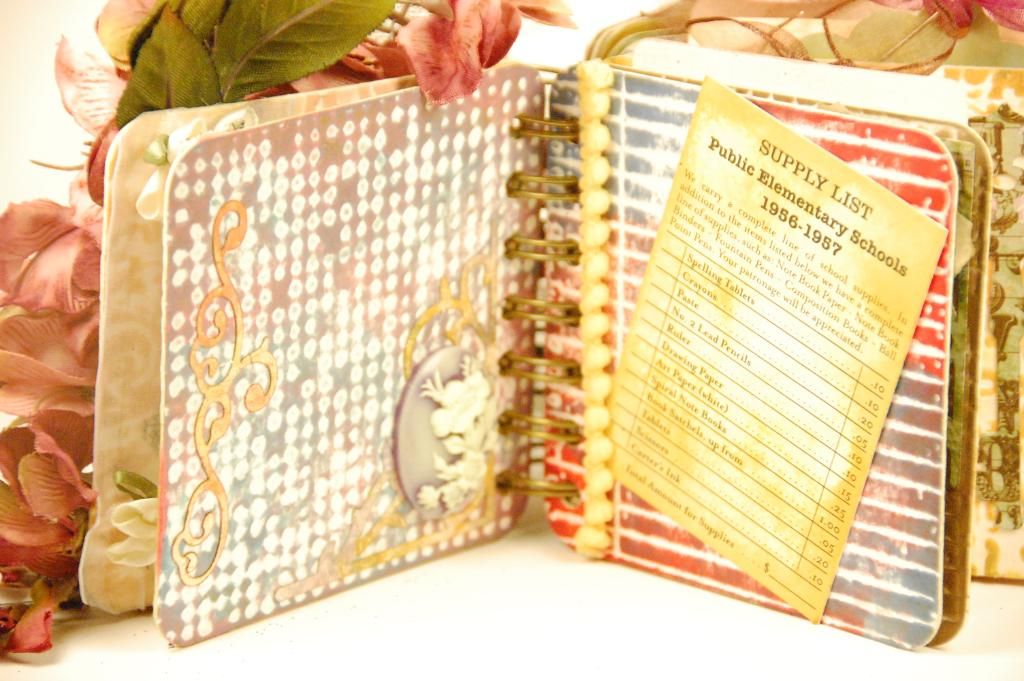
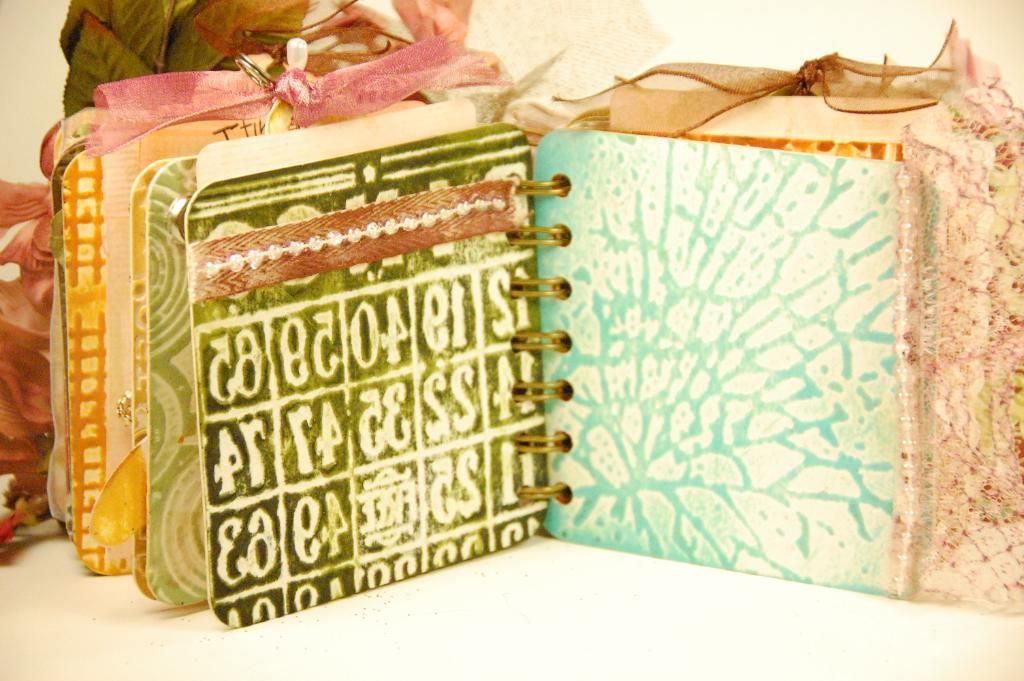
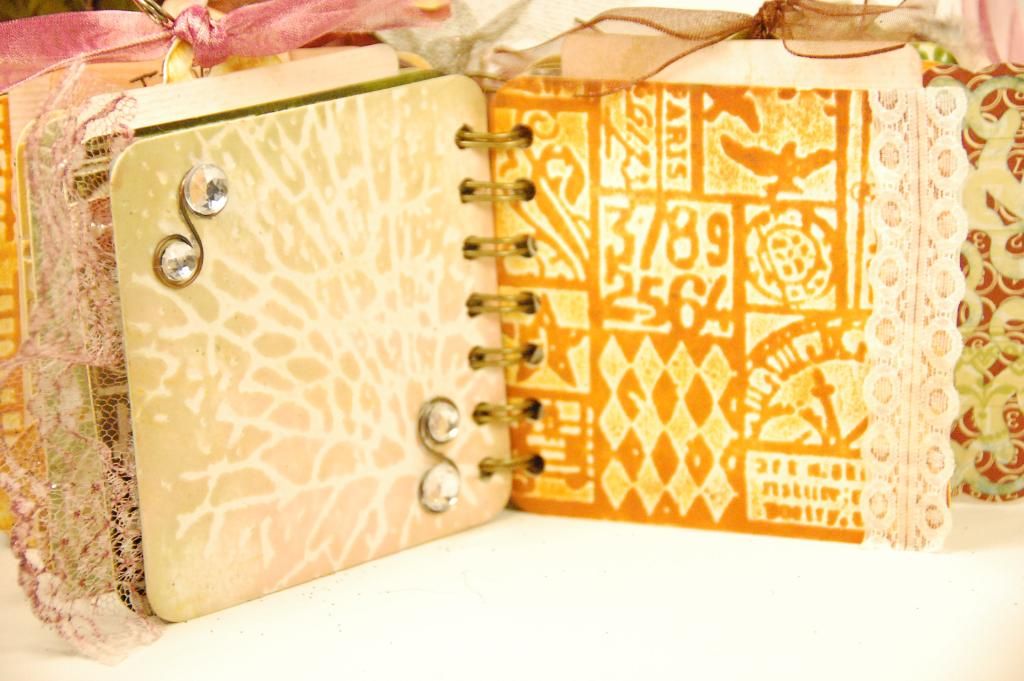
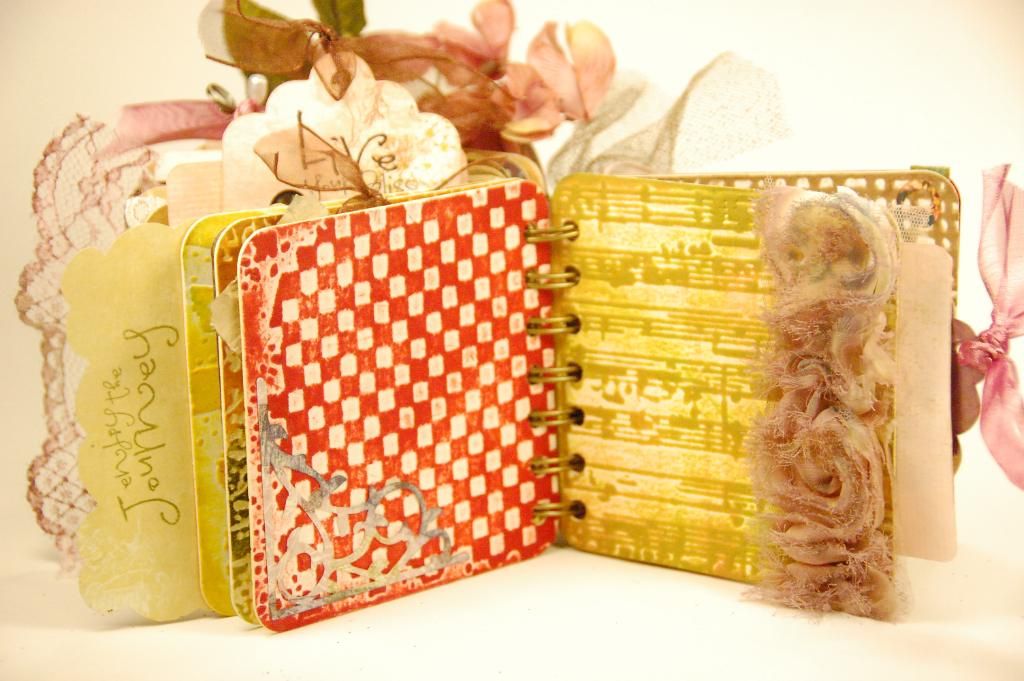
Hi everyone! This is Elizabeth from 217 Creations. I am Monique's Guest Designer today! I am head over heels for this mini album! I have over 30 pics to share plus a video! This entire mini is made using square coasters. I literally used EVERY Distress Ink color. I made it a point to mix and create rather than be systematic in my process. I find I create best when I let it just flow.
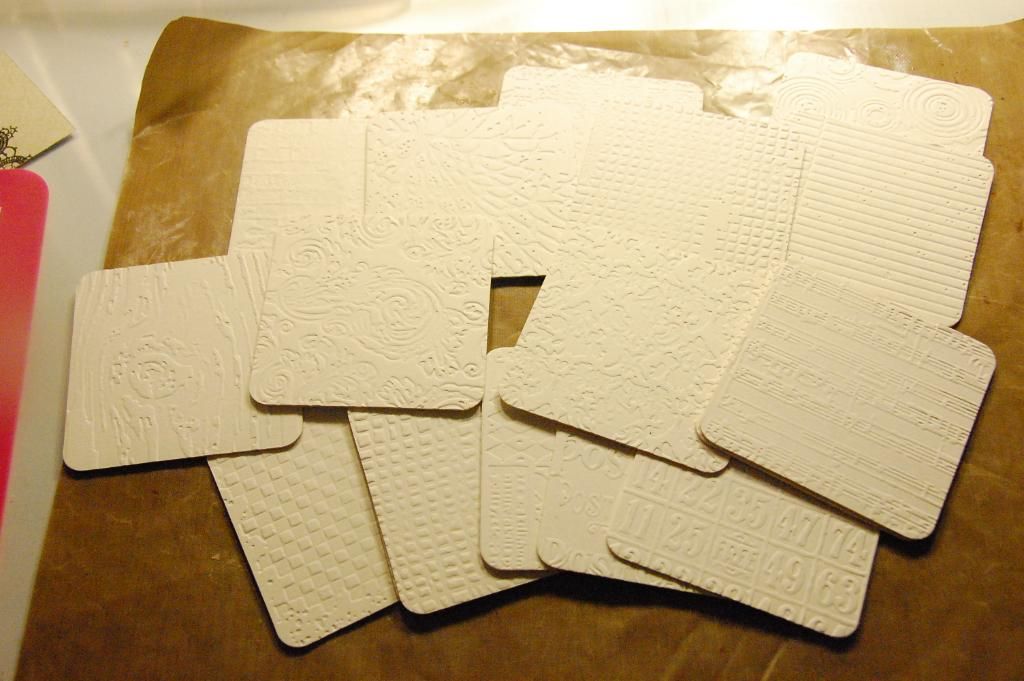
I started by embossing these square coasters with several embossing folders. Most of these are from Tim Holtz but I used my Cuttlebug to do the embossing. Because the the coaster material is thick, I got a nice deep embossing that is appealing to the eye and to the touch.

Next I dumped all my Distress Inks out (yes I own them all).
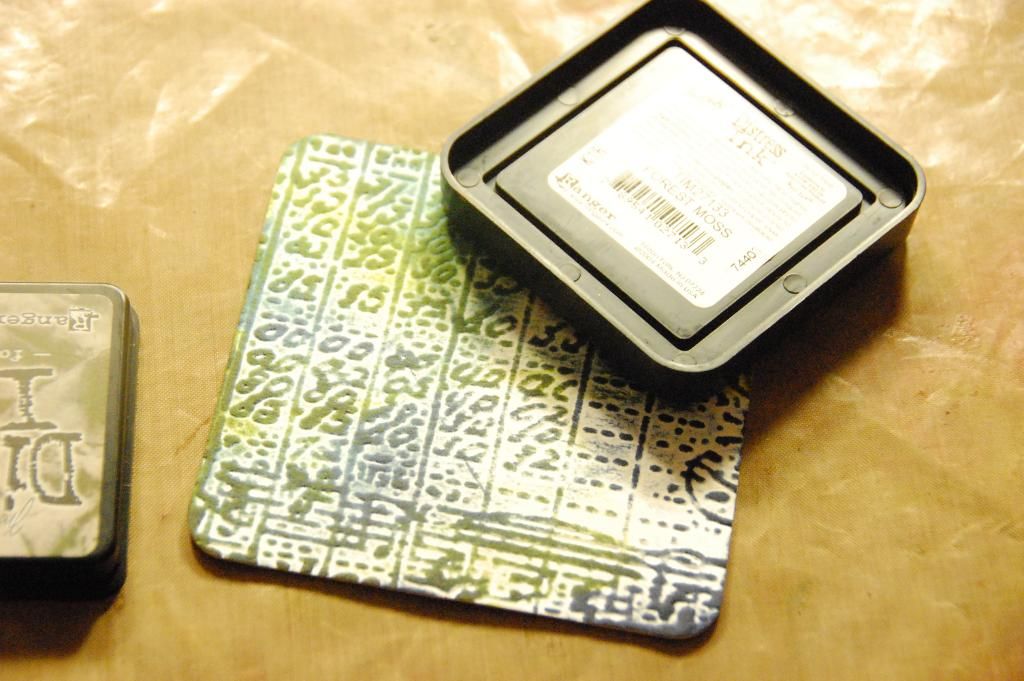
I began by swiping each coaster with the Distress Ink Pad directly. I did not use a sponge dabber or applicator for this process. I would highly recommend using a splat mat while you do this. I am not super picky when it came to my colors mixing. In fact, I wanted them to. So I did not "clean" between ink colors on my mat. The effect is beyond cool. So it maybe difficult to say which colors are specifically on each coaster page.
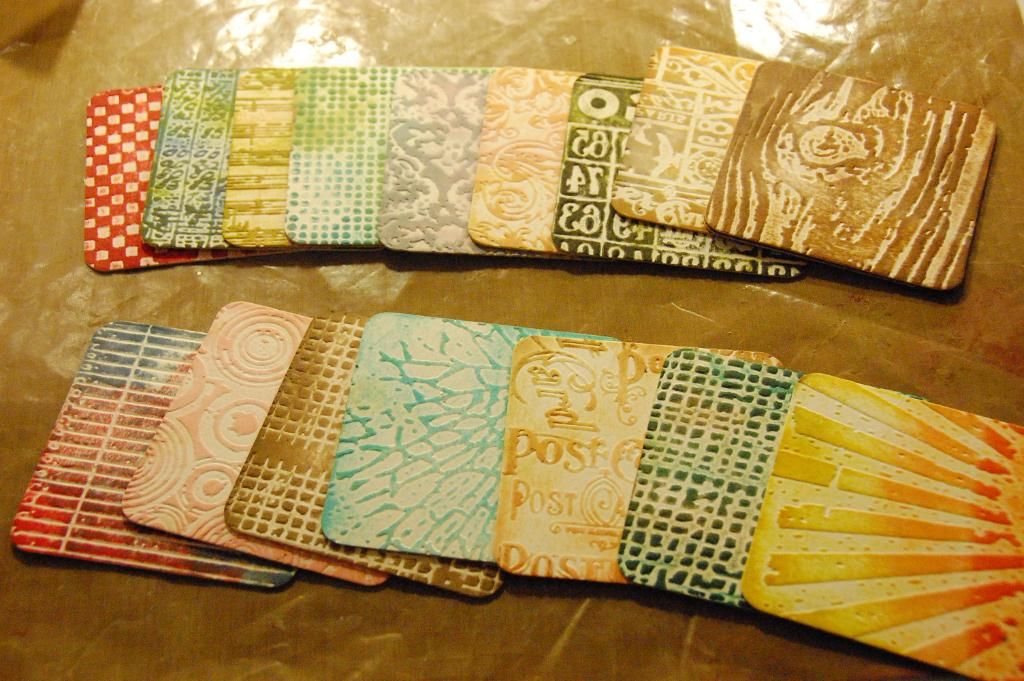
Here they are all embossed and inked. You will notice when you do the swiping how the embossing just pops out and becomes so defined!
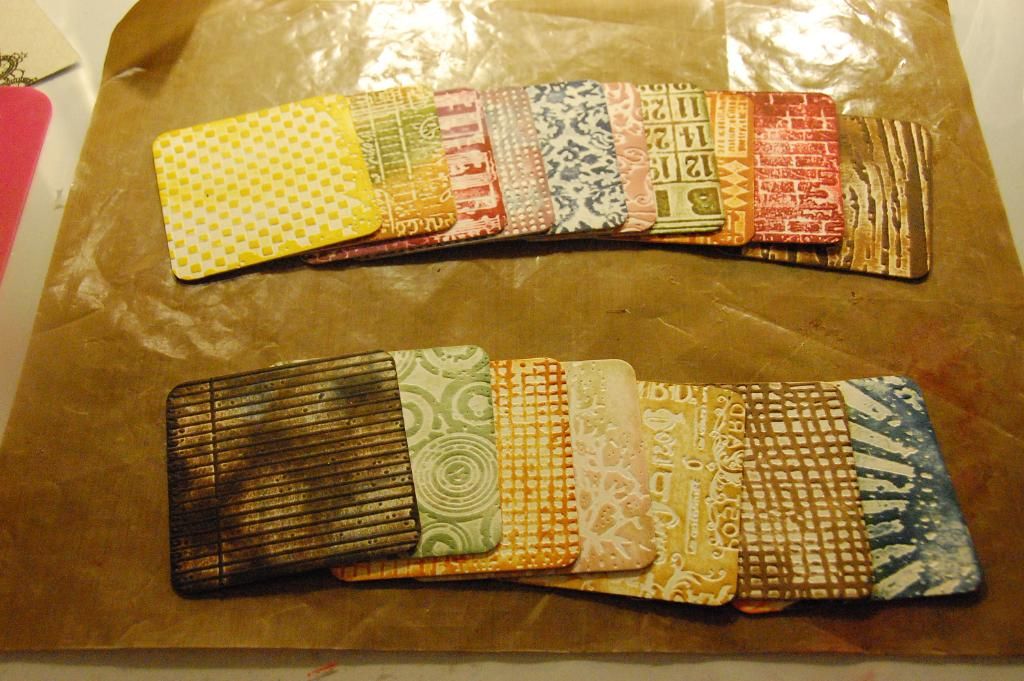
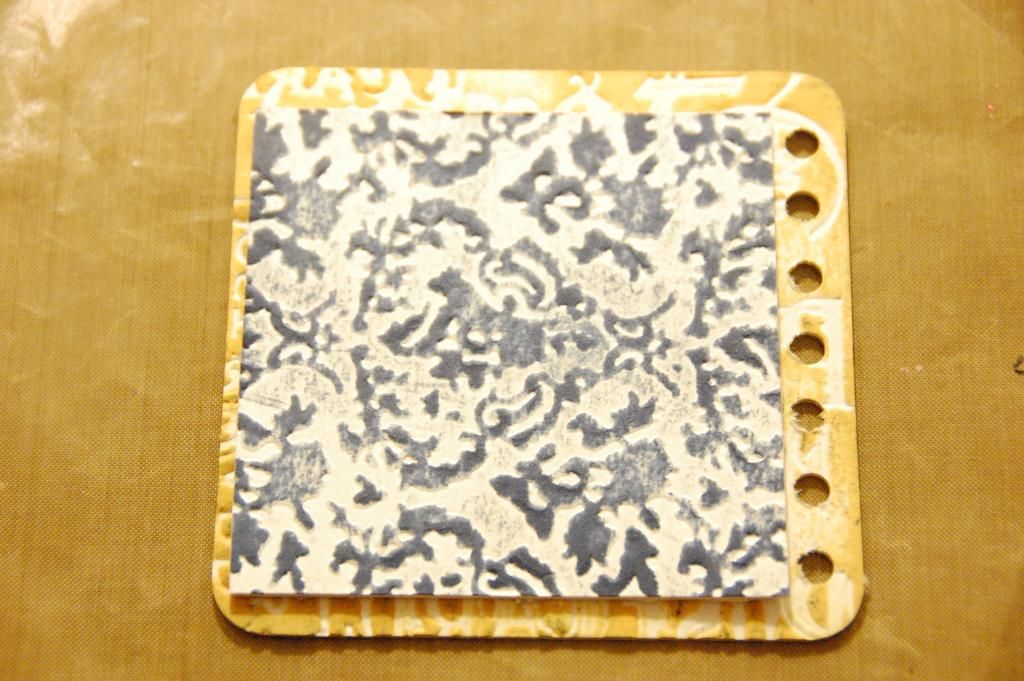
Here are the backsides. I made it a point not do the same the color combination throughout the album.
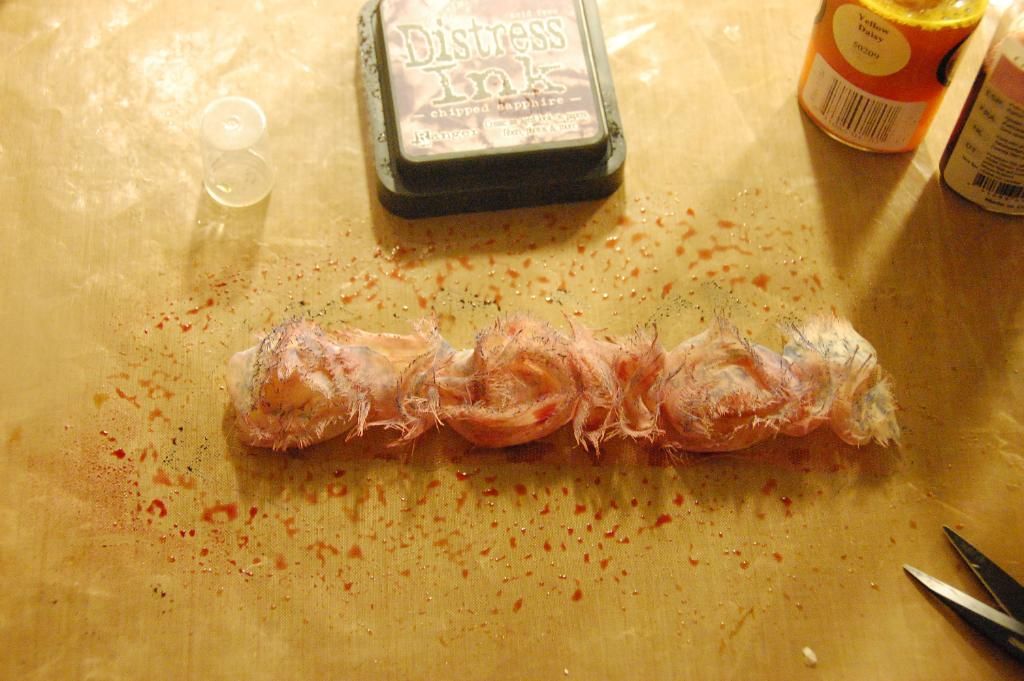
All the ribbon is from my stash, as well as most of the findings! What I love about this size of mini, I can use lots of scraps to complete the project! To tint these rosettes, I spray Sapphire Glimmer Mist, Yellow Daisy, Wheatfields, and Cranberry Zing. Then I pressed a little Chipped Sapphire Distress Ink into the ribbon.
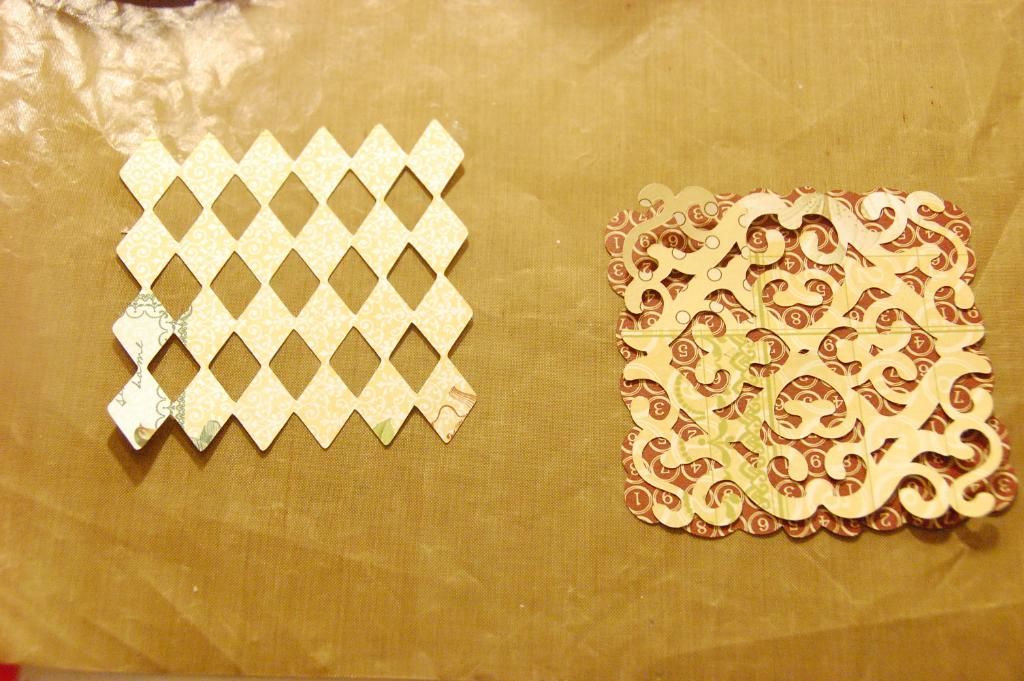
All the paper is from Webster's Pages. These cuts are from Paper Lace.
The argyle looking cut is cut at 3.35 inches (real size off). The scrolling and its shadow are cut at 3.83 inches (real size off).
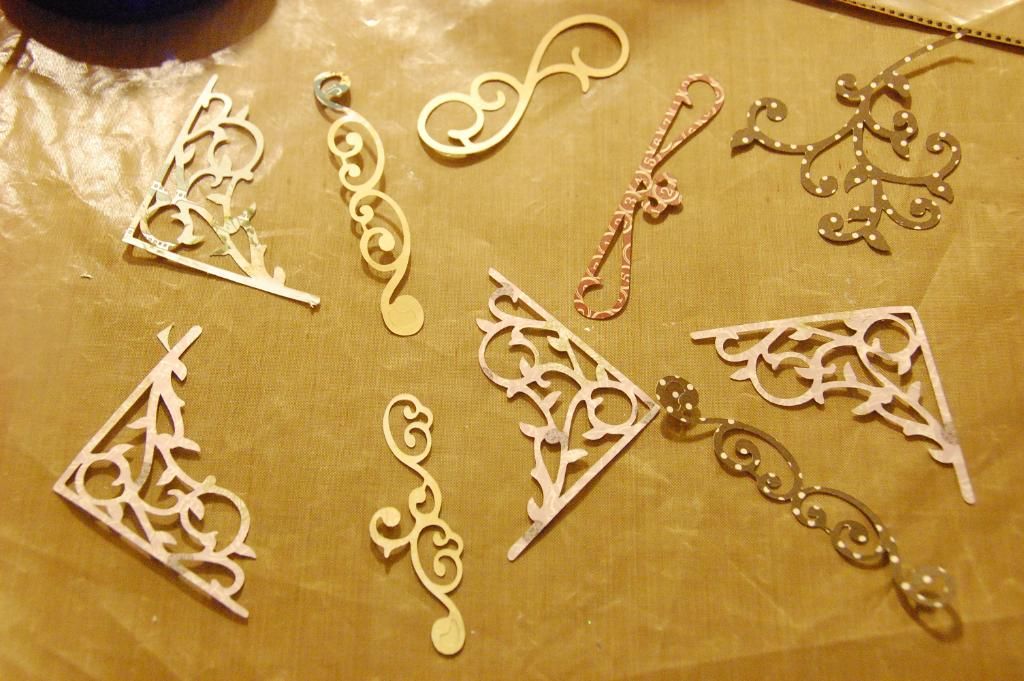
These are from Heritage. The corners are cut at 2.42 inches (real size off). The various scrolls are all cut at (real size off):
A-1.0 inches
B- .61 inches
C- 2.06 inches
D- .61 inches
E- 3.12 inches
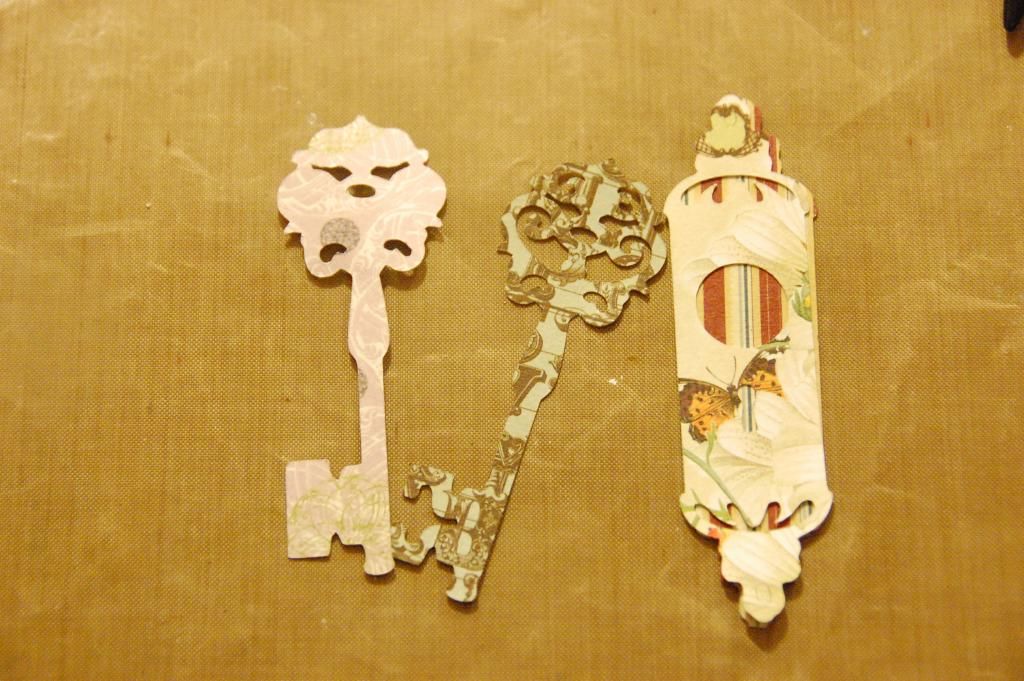
These are from Sentimentals.The key and it shadow are cut at 3.35 inches (real size off). The keyhole and its shadow are cut at 3.82 inches (real size off).
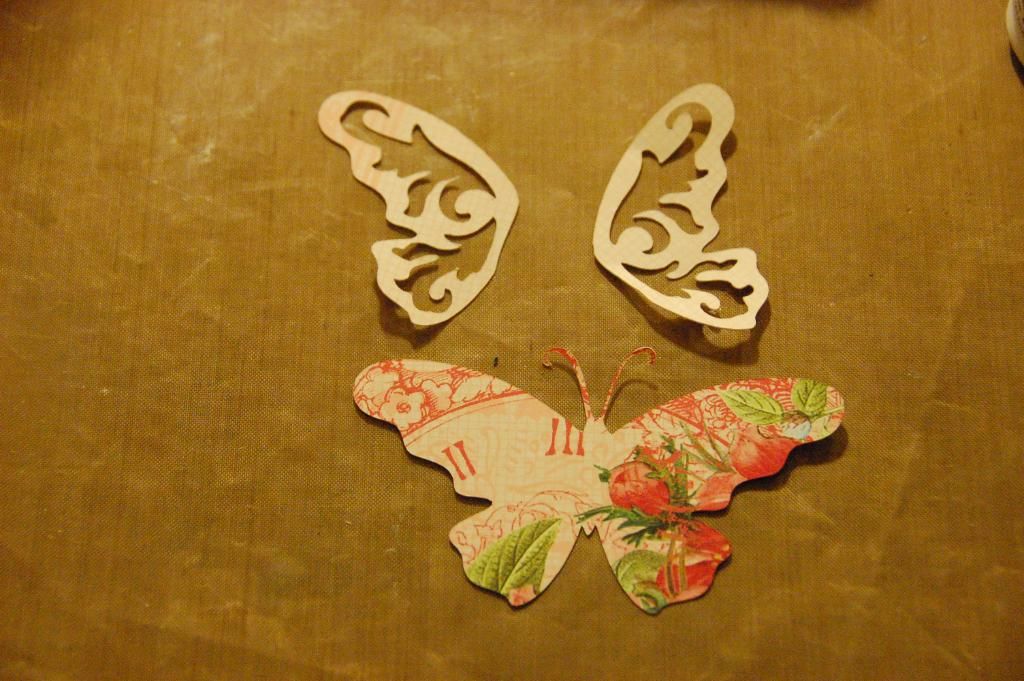
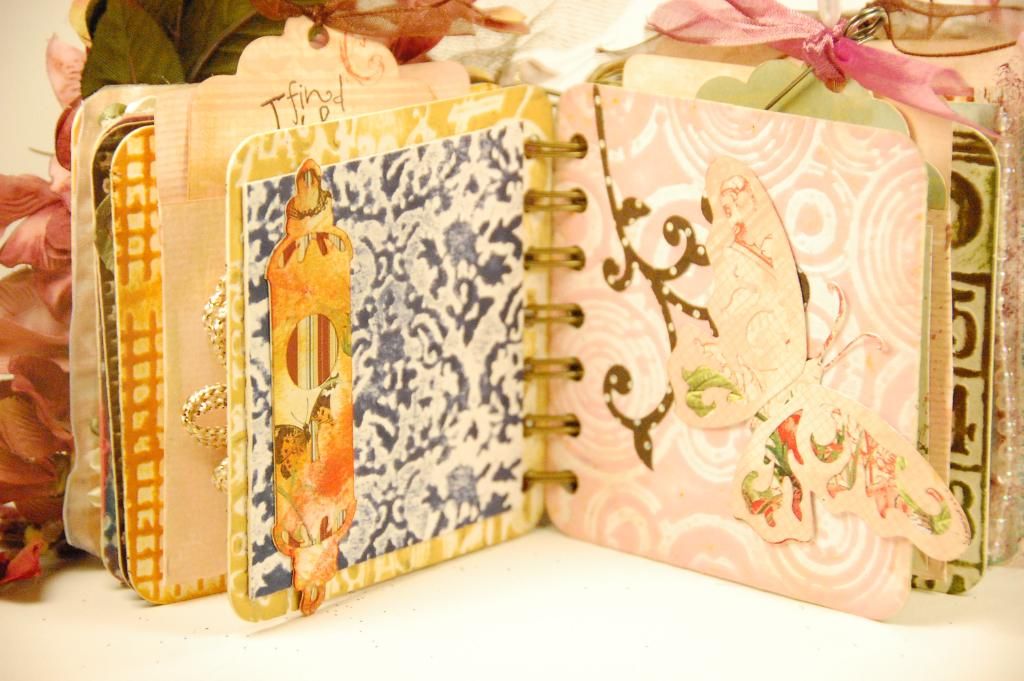
This Butterfly is also from Sentimentals at 2,18 inches (real size off)
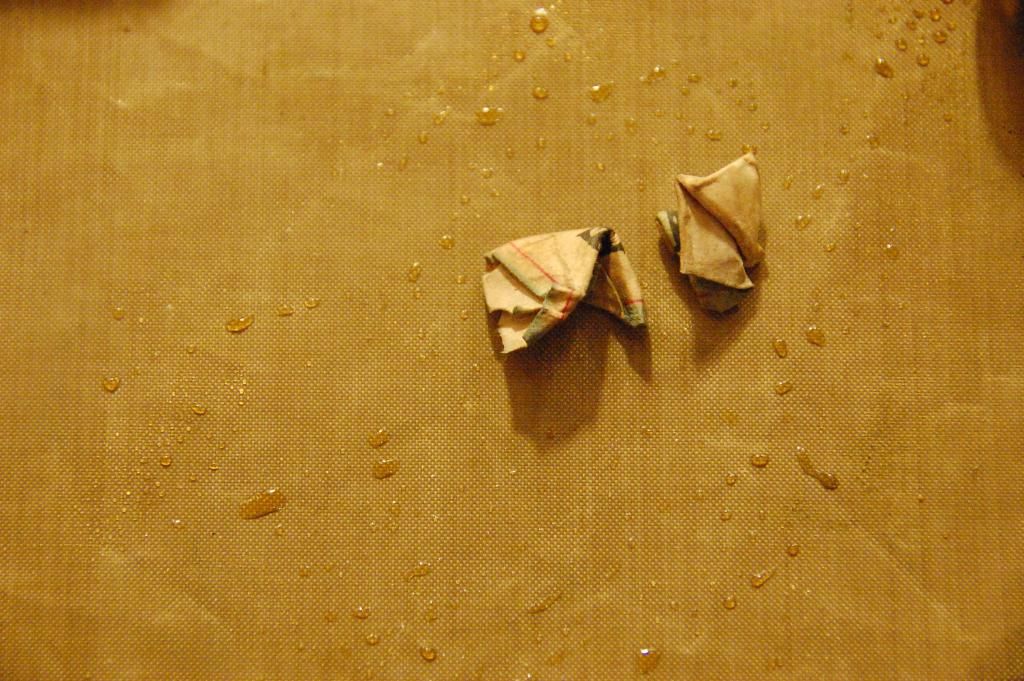
Next I worked on some Tim Holtz Addage Tags. I inked them up, sprayed with Wheatfields Glimmer Mist, Crumpled and let dry.
Then unfolded and - tattered old looking paper! LOVE IT!
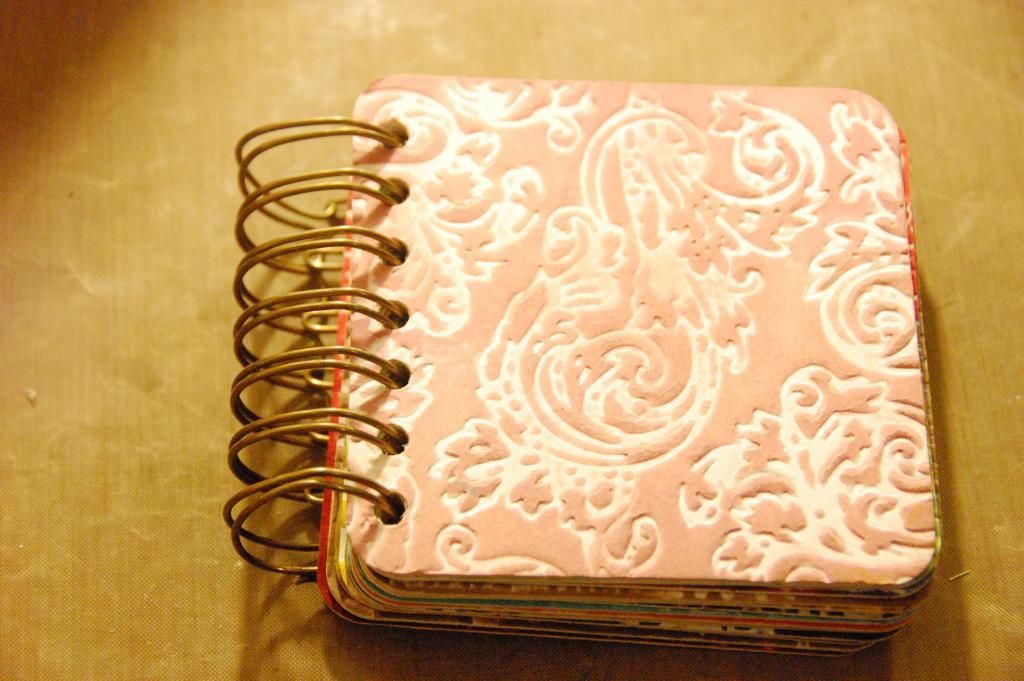
While everything was drying, I bound my coaster pages with the Cinch. I used a 1.25 inch ring in Antique Brass. I have gotten pretty good at my CInch but every now and then- OOPS!
This is an "OOPS!". I got going too fast and did not push the coaster all the way into the machine.
I could not bare to throw away the coaster, so I cut it down to size and used it as a mat for another page.
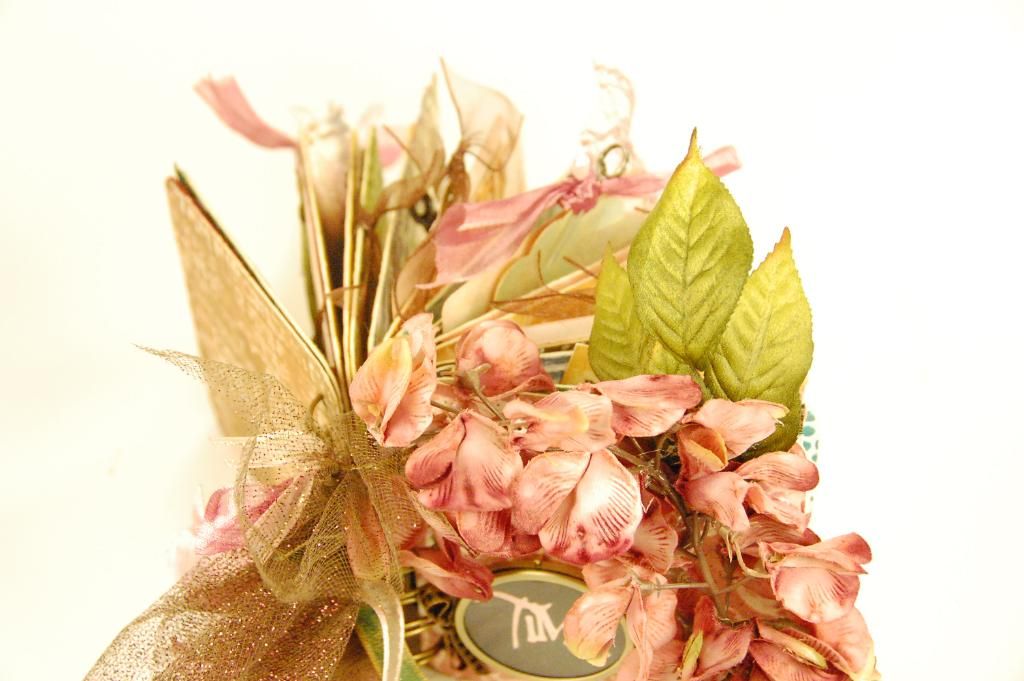
Finally I added all my embellishments to my pages and then began work on the cover. I used a floral spray from Hobby Lobby. I actually "threaded it down the spine inside the binding. I used hot glue to hold it down in select areas. Once the flowers were dried, I tied all my ribbon along the side. I used several pieces of glittered tulle. I also added the charm that says "Time"
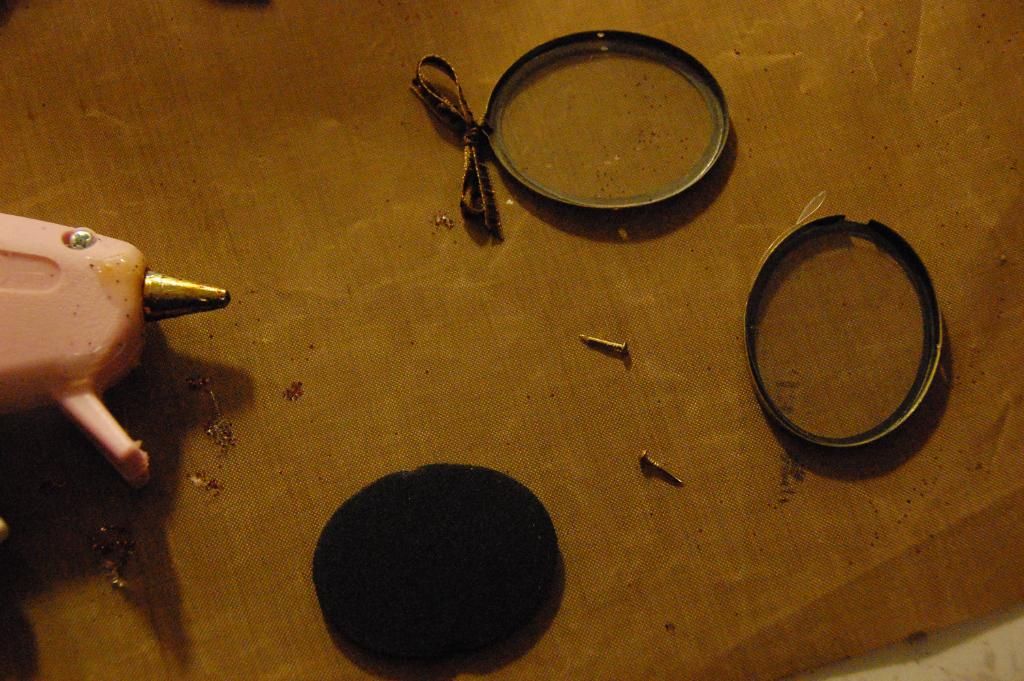
This cut is from Gypsy Wanderings at .76 inches (real size off). I took an old mini frame and disassembled it. I adhered the cut insdie then closed the frame back up. I also tied a small ribbon through the top.
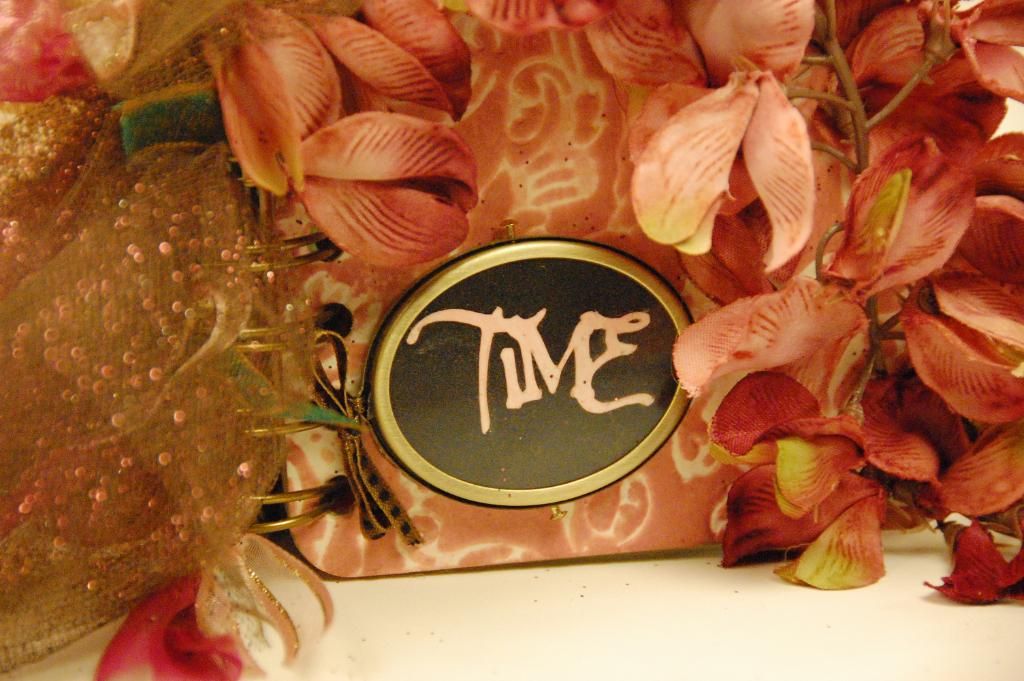
Then I hot glued it to the album cover.
So do you want to see it in action? Watch the video!
Here is some eye candy for you! Each page is distinct. As I said in the beginning, I cannot guarantee which colors are on which pages because of the swiping method I used. I have some notations on materials that I have used.
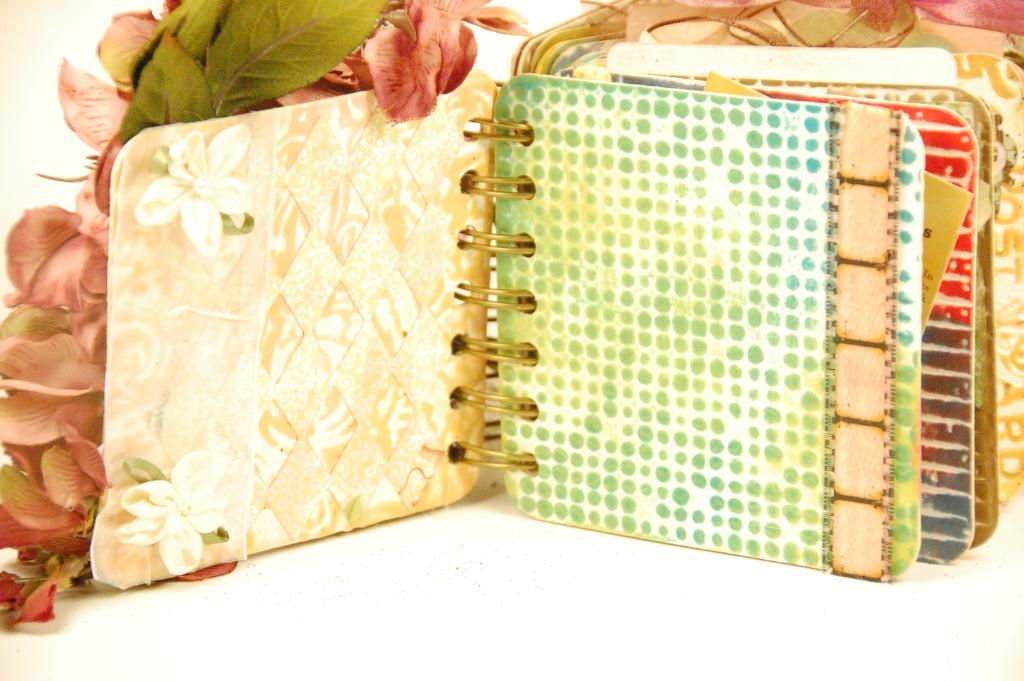
The satin flowers on the left page are form Hobby Lobby. I bought it by the yard. On the right hand side, I used Victorian Velvet Distress Ink to tint some twill ribbon. Then I used Terrifically Tacky Tape to stick it down. Finally I used some Film Strip Ribbon from Tim Holtz on top. To adhere the film strip to the ribbon, I used Tombo Vellum runner.
The left hand side has my cuts from Heritage as well as a Webster's Pages cameo. The right hand side is a card from October Afternoon.
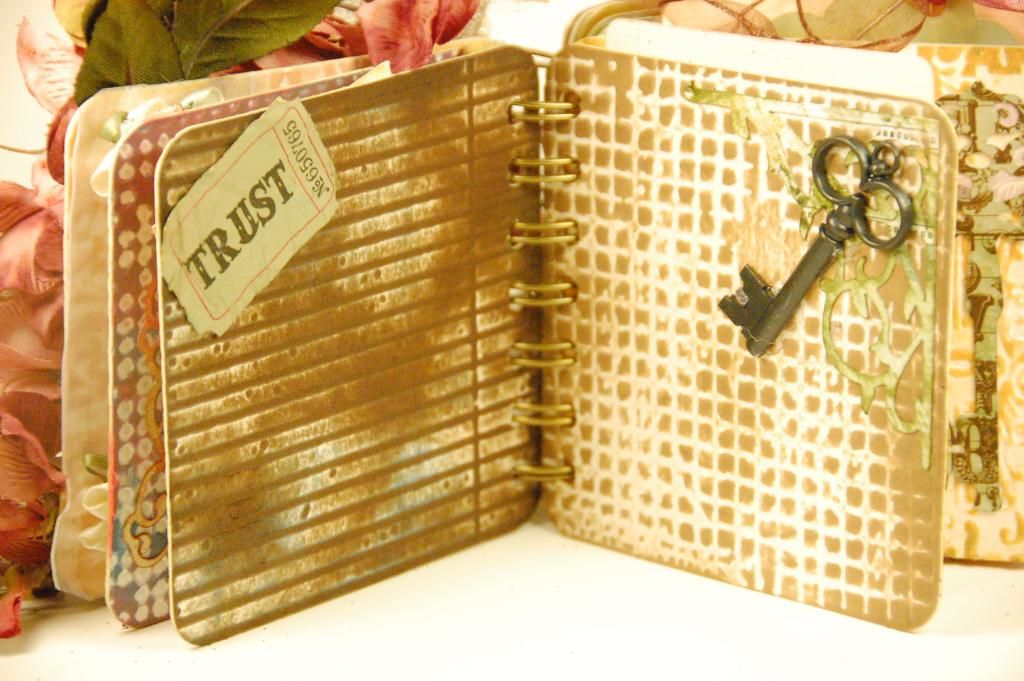
Left side has the addage tag and the right hand side has a metal key from my stash with a corner cut from Heritage.
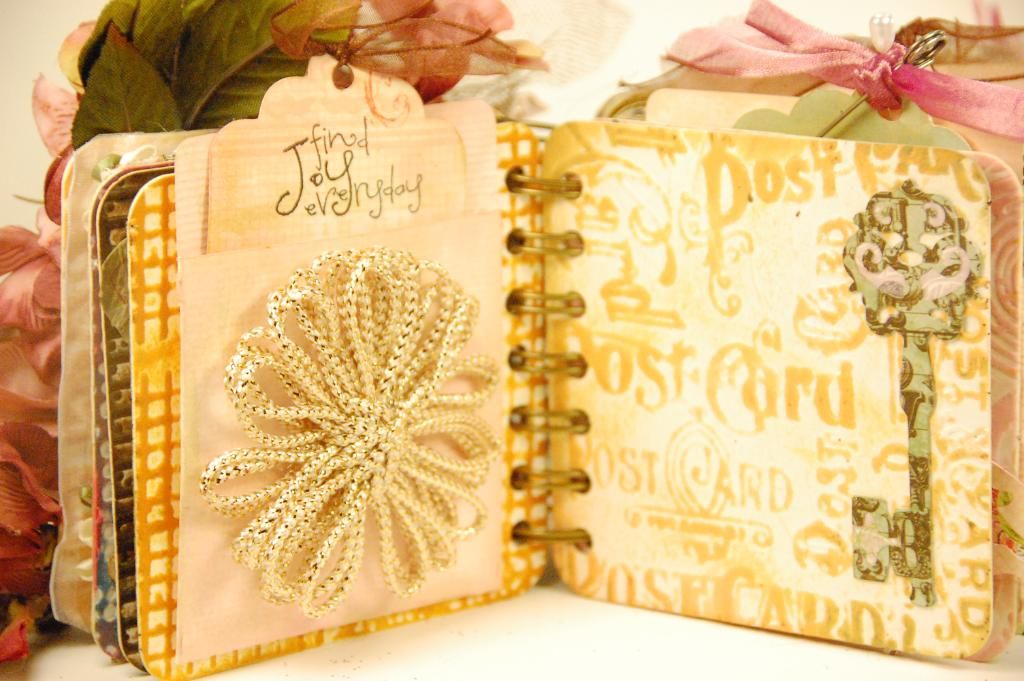
The flower is actually made from the Knifty Knitter. The pockets are from Sentimentals. I cut them at 3.82 inches (real size off). The tag is also from Sentimentals. It was cut at 4.06 inches (real size off). The tags were stamped with sentiments from Pink By Design "Enjoy the Journey"
So pretty!!! I love the layering!

I used some metal washer on this page with a random number disc that I got out a rummage bin at a scrapbook store.
I layered twill ribbon that was swiped with Aged Mahogany Distress Ink and then I hot glued a line of beads. On the right hand side, I used TTT (Terrifically Tacky Tape) to hold the lace on the edge. The lace is tinted with left over ink and Glimmer Mist form my mat.
On the left I added some metal swirls and rhinestones to add some Bling! The right hand side I added small strip of stretchy lace. Once again I used TTT to adhere the ribbon the the page.

The tag's sentiment is again from Pink by Design "Enjoy the Journey". The sayings on the front of the pocket are actually a rubber cling I have from Tim Holtz. I love those metal clips at add pics and findings! The right hand side is one of my favorite parts of this album. It over hangs the side a bit so there is a small "tab" hanging out. On the backside of the "tab" . . .
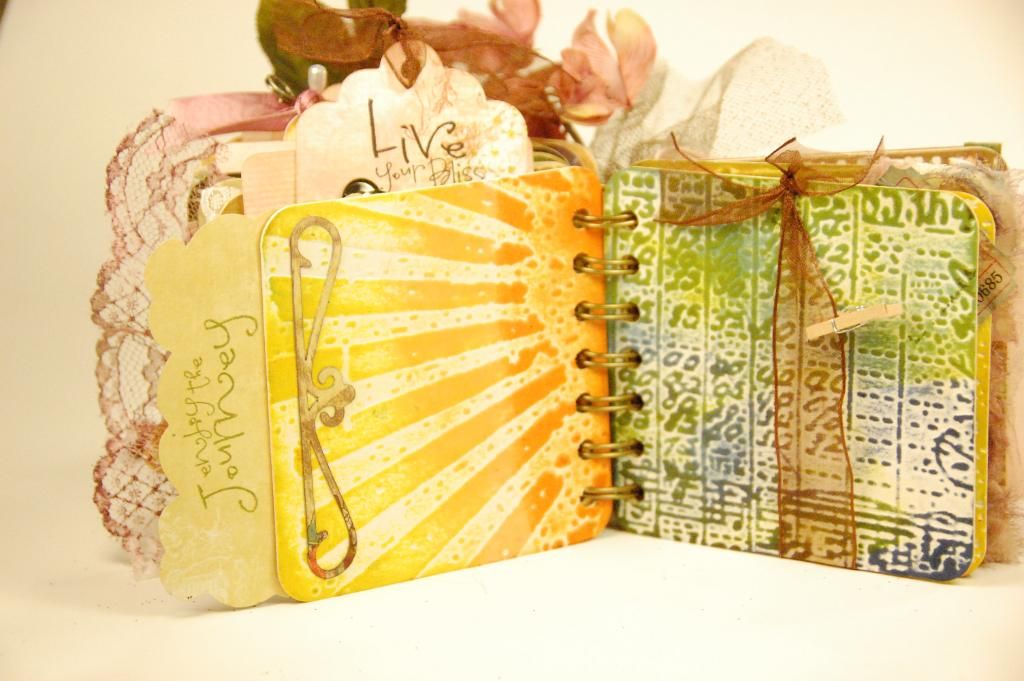
I stamped "Enjoy the Journey" from Pink By Design. I also added a cut from Heritage. The right hand side, I wrapped a ribbon around and added a mini clothespin.
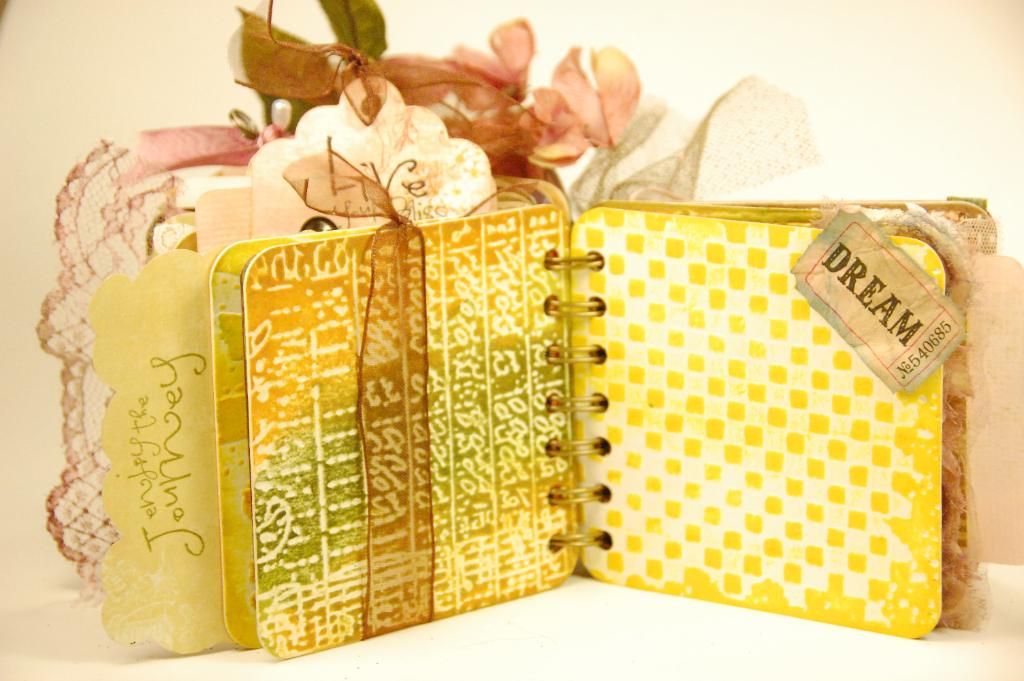
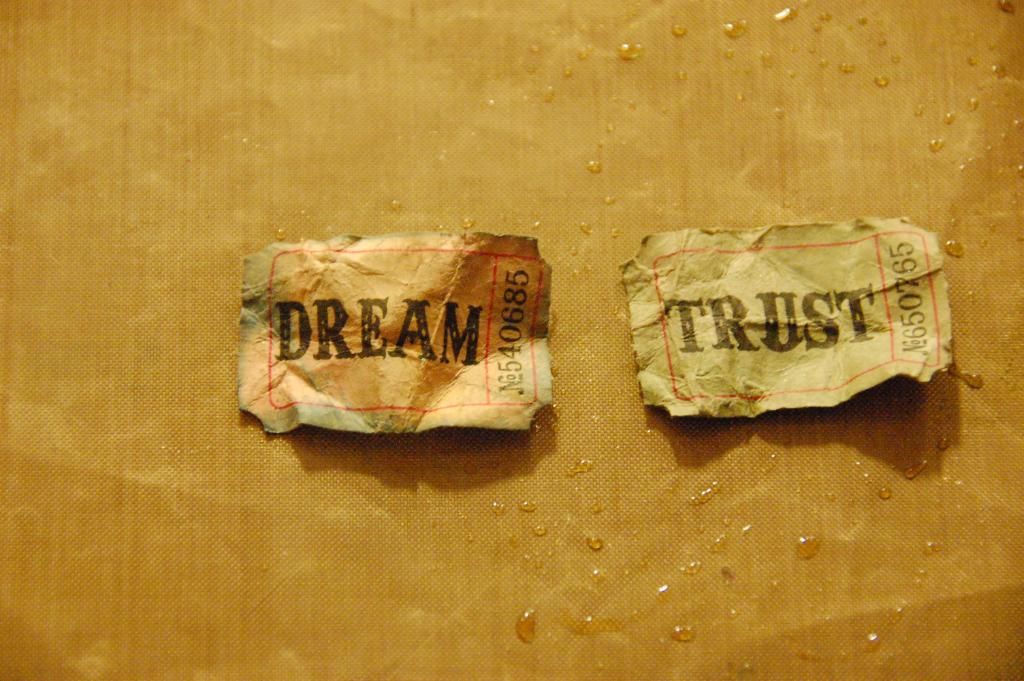
I added the addage tag "Dream" to the right hand side.
On the left, I adhered a cut from Heritage and on the right I added the tinted rosette ribbon.

On this pocket and tag, I added a silk orchid and some greenery. On the right I added a scrolled cut from Heritage.
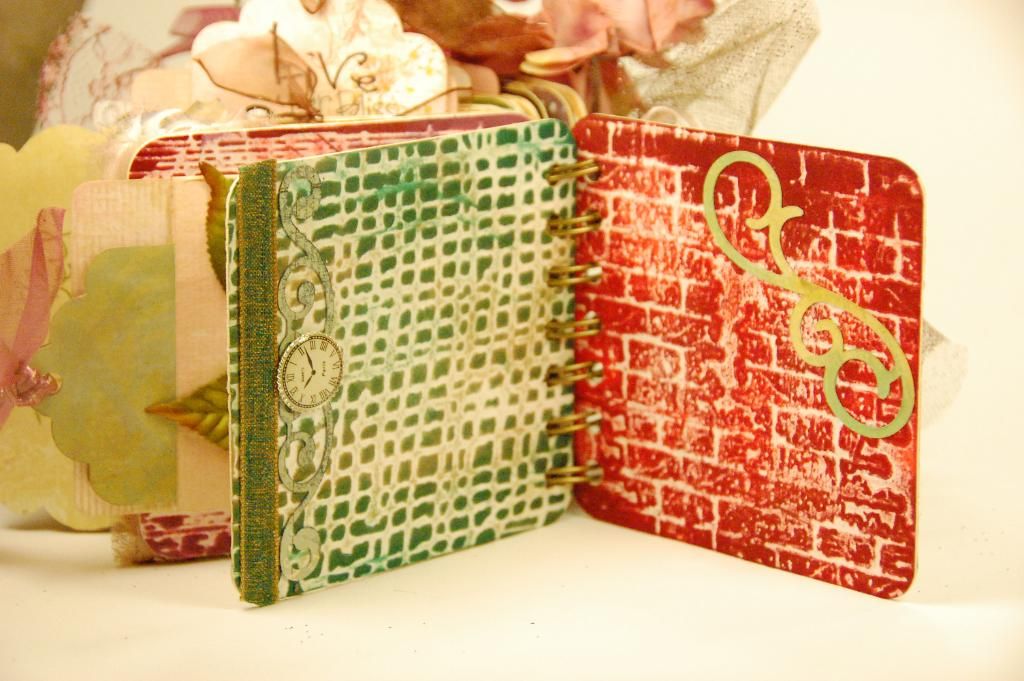
On the left I added a strip of ribbon and then the scrolling from Heritage. Then I added a mini clock that I bought from a mixed lot off ebay. On the right I added another cut from Heritage.
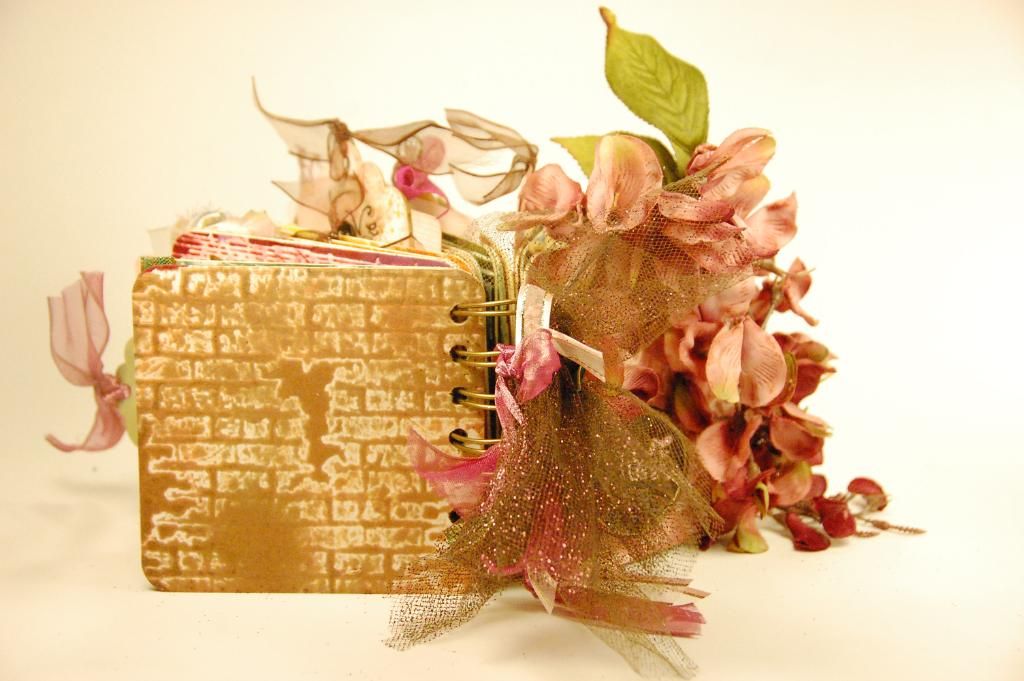
This is the back cover. I love how this mini can stand as piece of home decor or art for display.
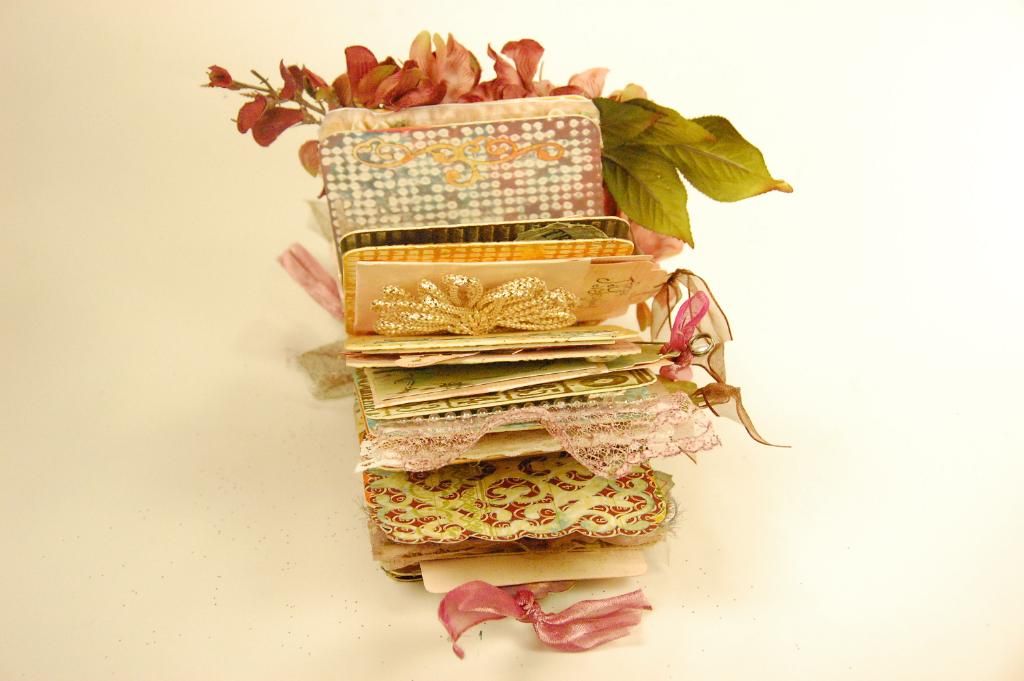
This is a view looking down.
I hope this mini is inspirational! I loved making it to share with all of you. I so appreciate your comments and following/subscribing here at Monique Griffith Designs and on my personal blog at 217 Creations. If you'd like to download this free Gypsy file, please visit this link: Time Mini Album
Thanks again and have a fab weekend!

Thanks again and have a fab weekend!

Subscribe to:
Posts (Atom)
About Me
- Monique Griffith
- Rocklin, CA, United States
- The Monique Griffith Design Team consists of 4 Cricut Designers: Monique, Wendy Lawrence, Susan Rees and Becca Rees. We specialize in making Cricut Project Kits that you can make on your own with your Cricut, learning more about your bug in the process. You just need your Cricut Expression, the required cartridge(s), and a few basic tools. The directions come with a Cricut Cut Chart that shows you line by line exactly what you'll need to cut on your machine, with all of the settings for each cut. There are also well-organized written instructions and color photographs. We pride ourselves on our detailed designs, and on teaching others how to most effectively design with the Cricut. Currently, we have have downloadable directions on sale for only $5, and there are over 50 projects to choose from.
Counter

Grab my Button!
